How to Fix Cracks in Your Hollow Log or Tubular Round Lumber — The IC WOOD DIY Guide
Real wood cracks. Here are the two exact repair methods we use at IC WOOD — the wood dowel spline method for structural cracks, and the expanding foam method for surface checks — with step-by-step photos straight from our shop floor. Both methods apply to Hollow Logs and Tubular Round Lumber.

How to Fix Cracks in Your Hollow Log or Tubular Round Lumber
Real wood cracks. That is not a defect — it is proof that your product is exactly what it claims to be: a solid, authentic piece of nature.
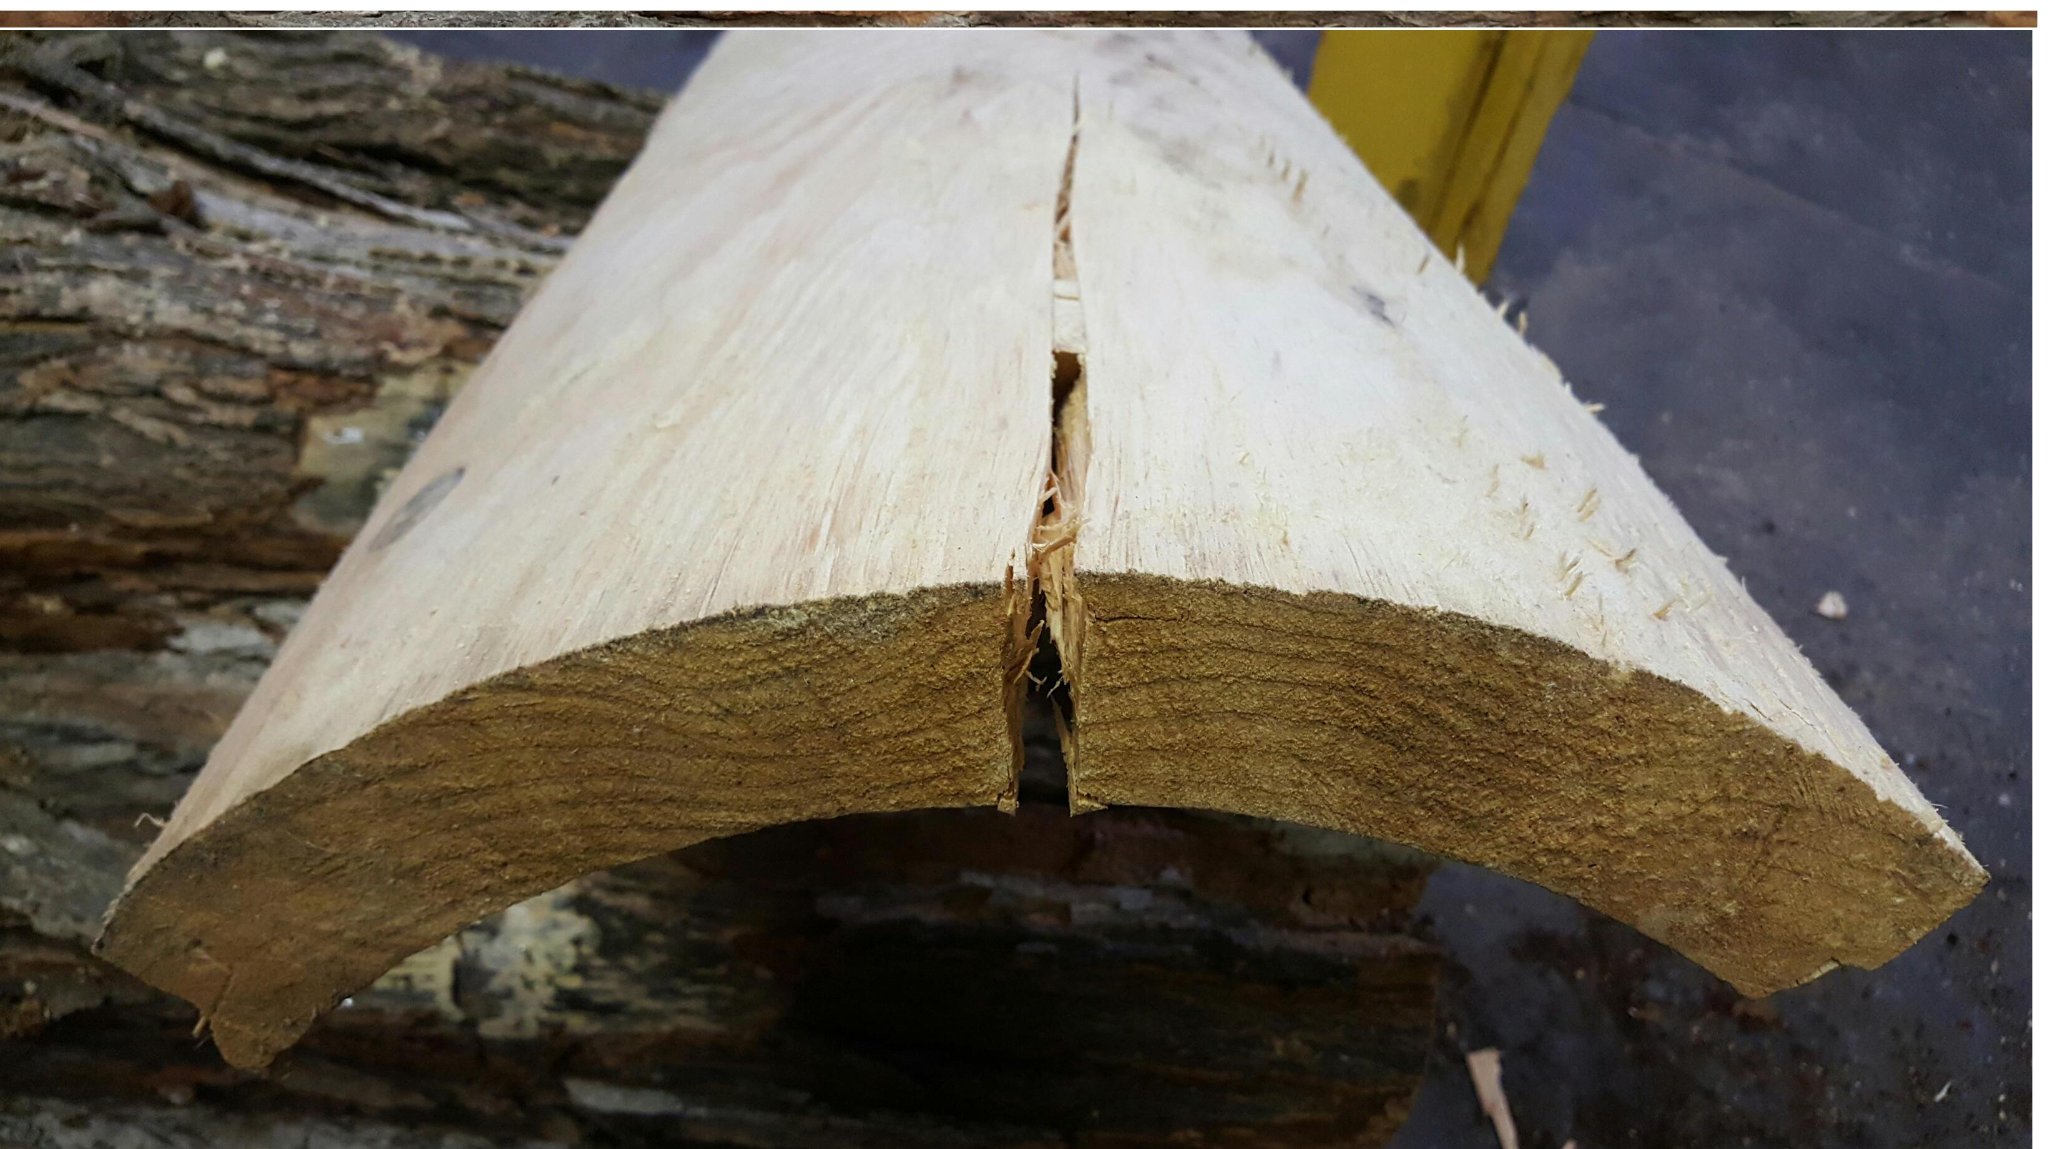
When a large log is hollowed and the internal tension is released, the wood naturally wants to move. Seasonal humidity changes, temperature swings, and the simple physics of drying wood all contribute to surface checks and cracks over time. Every species does it. Every size does it. It is completely normal, and it does not affect the structural integrity of your log.
Both methods described here apply equally to IC WOOD Hollow Logs and Tubular Round Lumber. The geometry is different but the wood behaves the same way, and the repairs are identical.
What You'll Need
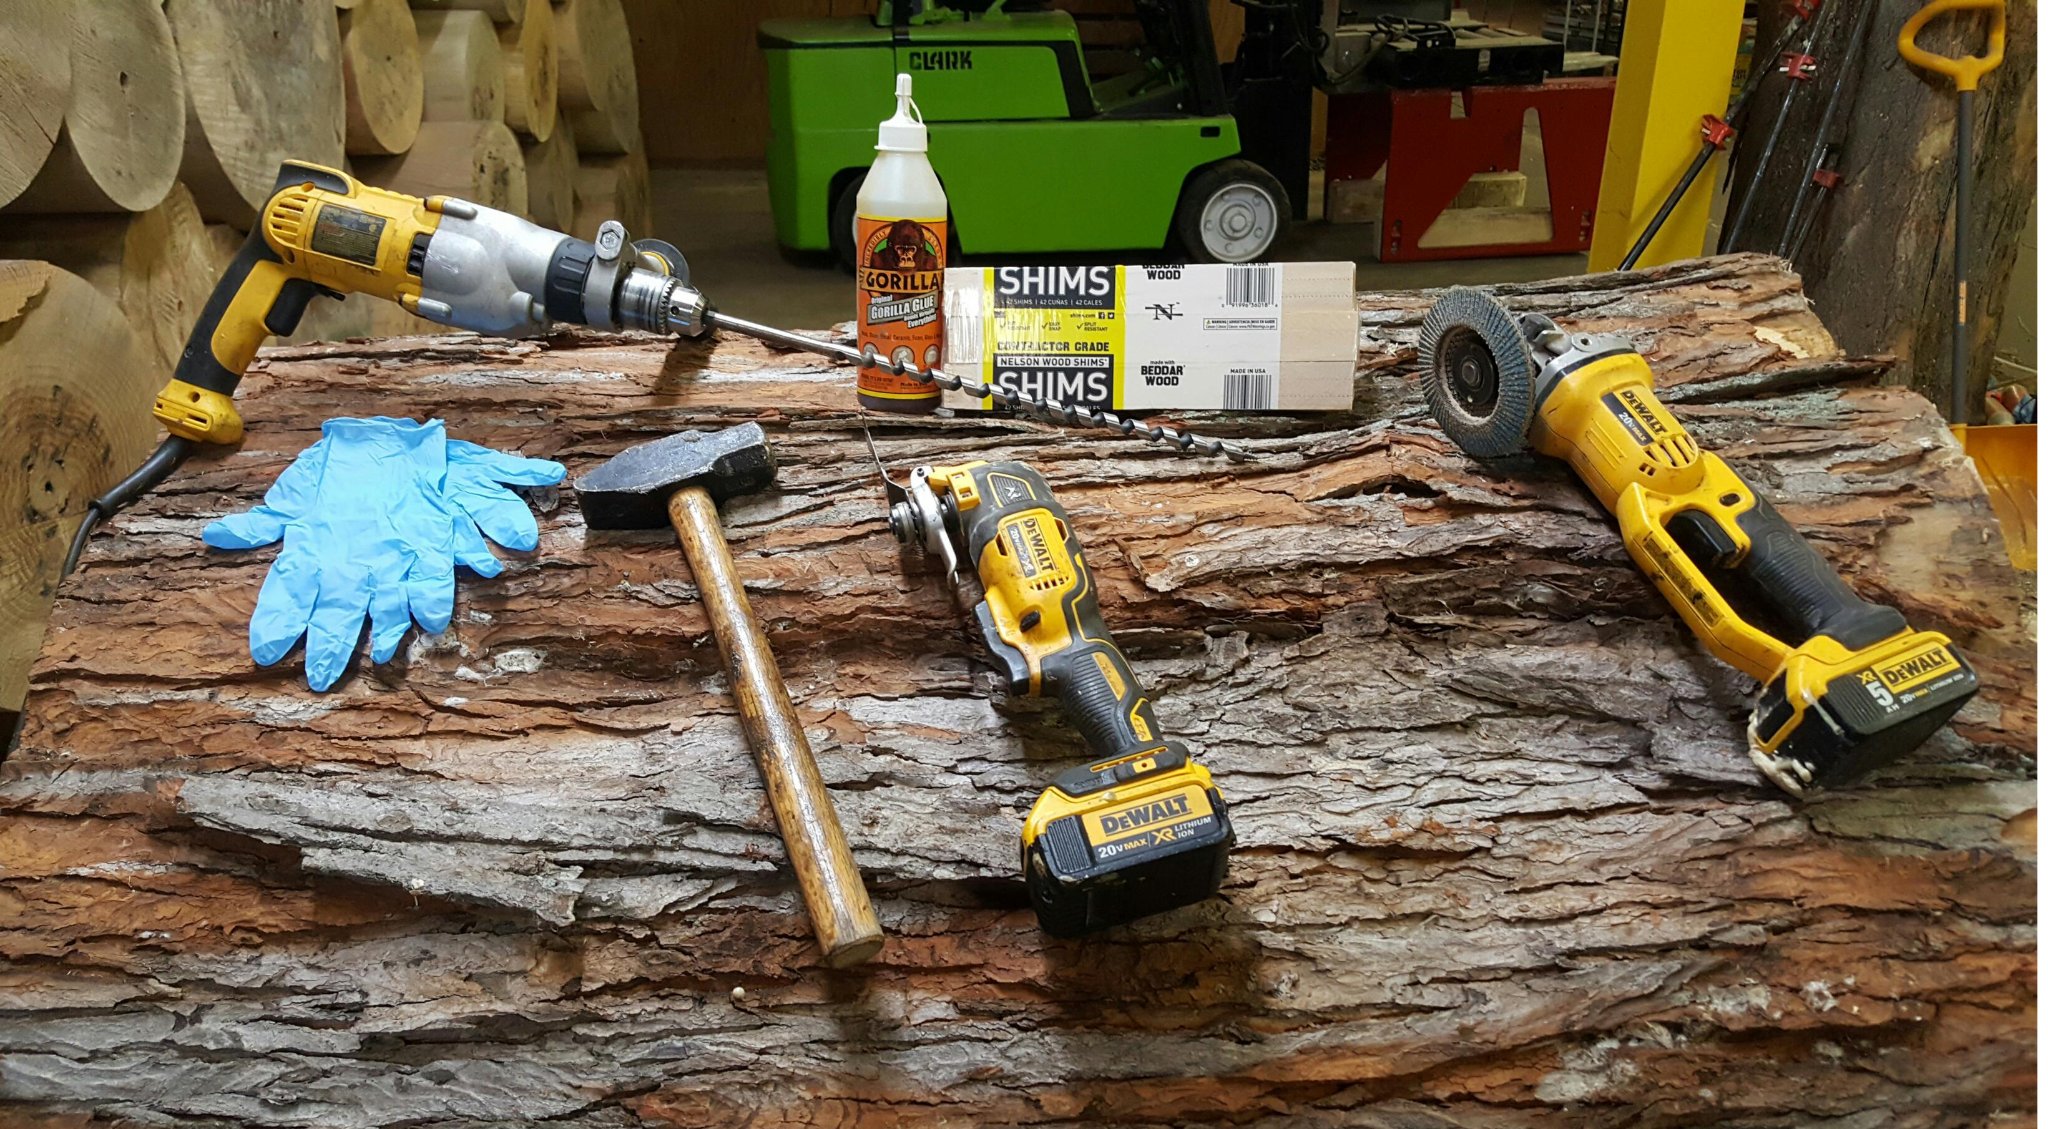
Here is everything you need to have on hand before you start. You will not use all of these on every repair — which tools you reach for depends on which method you use and how severe the crack is.
Tools:
- DeWalt hammer drill with long auger bit (for drilling spline channels)
- DeWalt oscillating multi-tool with wood blade (for trimming splines and foam flush)
- DeWalt angle grinder with 40-grit flap disc (for final surface smoothing)
- Rubber mallet (for driving splines)
- Nitrile gloves
Materials:
- Gorilla Glue Original (expanding polyurethane — bonds wood, foam, and virtually everything else)
- Nelson cedar wood shims or hardwood dowel rods (for splines)
- Elmer's ProBond Wood Filler, stainable interior/exterior (for finishing)
- Expanding polyurethane foam — Great Stuff or equivalent (for the foam method)
- Corrugated cardboard strips (for backing when crack opens into the hollow)
Choosing Your Method
There are two repair approaches. Use the right one for the job:
| Situation | Method |
|---|---|
| Crack is narrow (under ¼"), cosmetic only | Method B — Expanding Foam |
| Crack is wider, structural, or separating | Method A — Wood Dowel Spline |
| Crack opens into the hollow cavity | Either method with cardboard backing |
| You want a stainable, wood-colored finish | Method A — finish with ProBond Wood Filler |
| Outdoor installation, maximum waterproofing | Method B — foam seals completely |
When in doubt, use Method A. The mechanical spline gives you structural reinforcement that foam alone cannot provide.
Method A — Wood Dowel Spline with Gorilla Glue
This is the structural repair method. A hardwood dowel rod is drilled through the crack perpendicular to its length, locking both sides of the wood together. Gorilla Glue bonds the spline into the channel as it expands into the surrounding wood fibers. The result is a repair that is often stronger than the original wood.
Step A1 — Assess and Prepare

Start by cleaning the crack faces with a stiff brush to remove any loose wood fibers, sawdust, or debris. If the crack has been open for a season or more, the faces may have dried and darkened — that is fine. The Gorilla Glue will bond to weathered wood.
Use the angle grinder with a 40-grit flap disc to lightly clean the surface around the crack. This removes any surface oxidation and gives the wood filler a fresh surface to bond to later.
Step A2 — Drill the Spline Channel
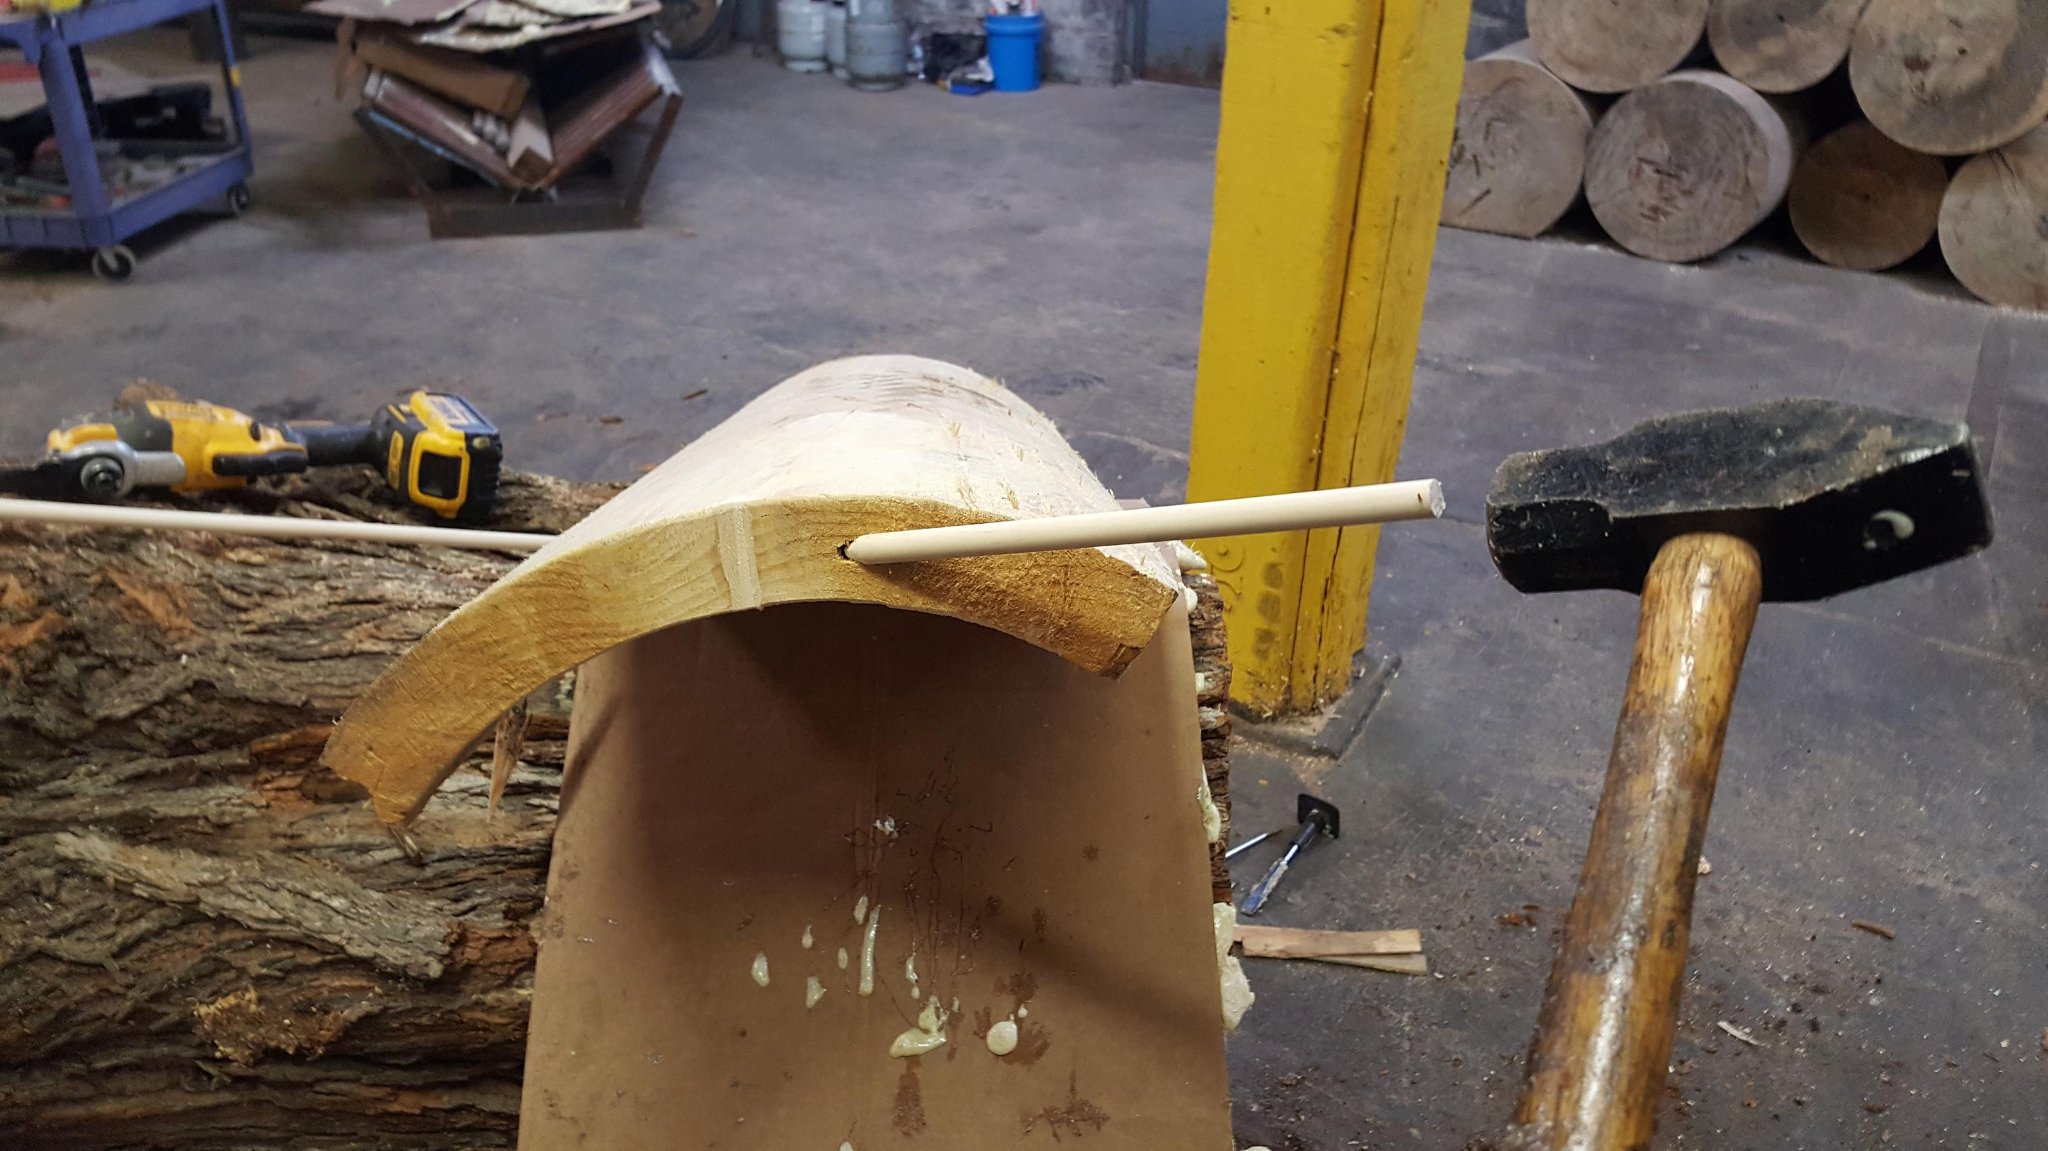
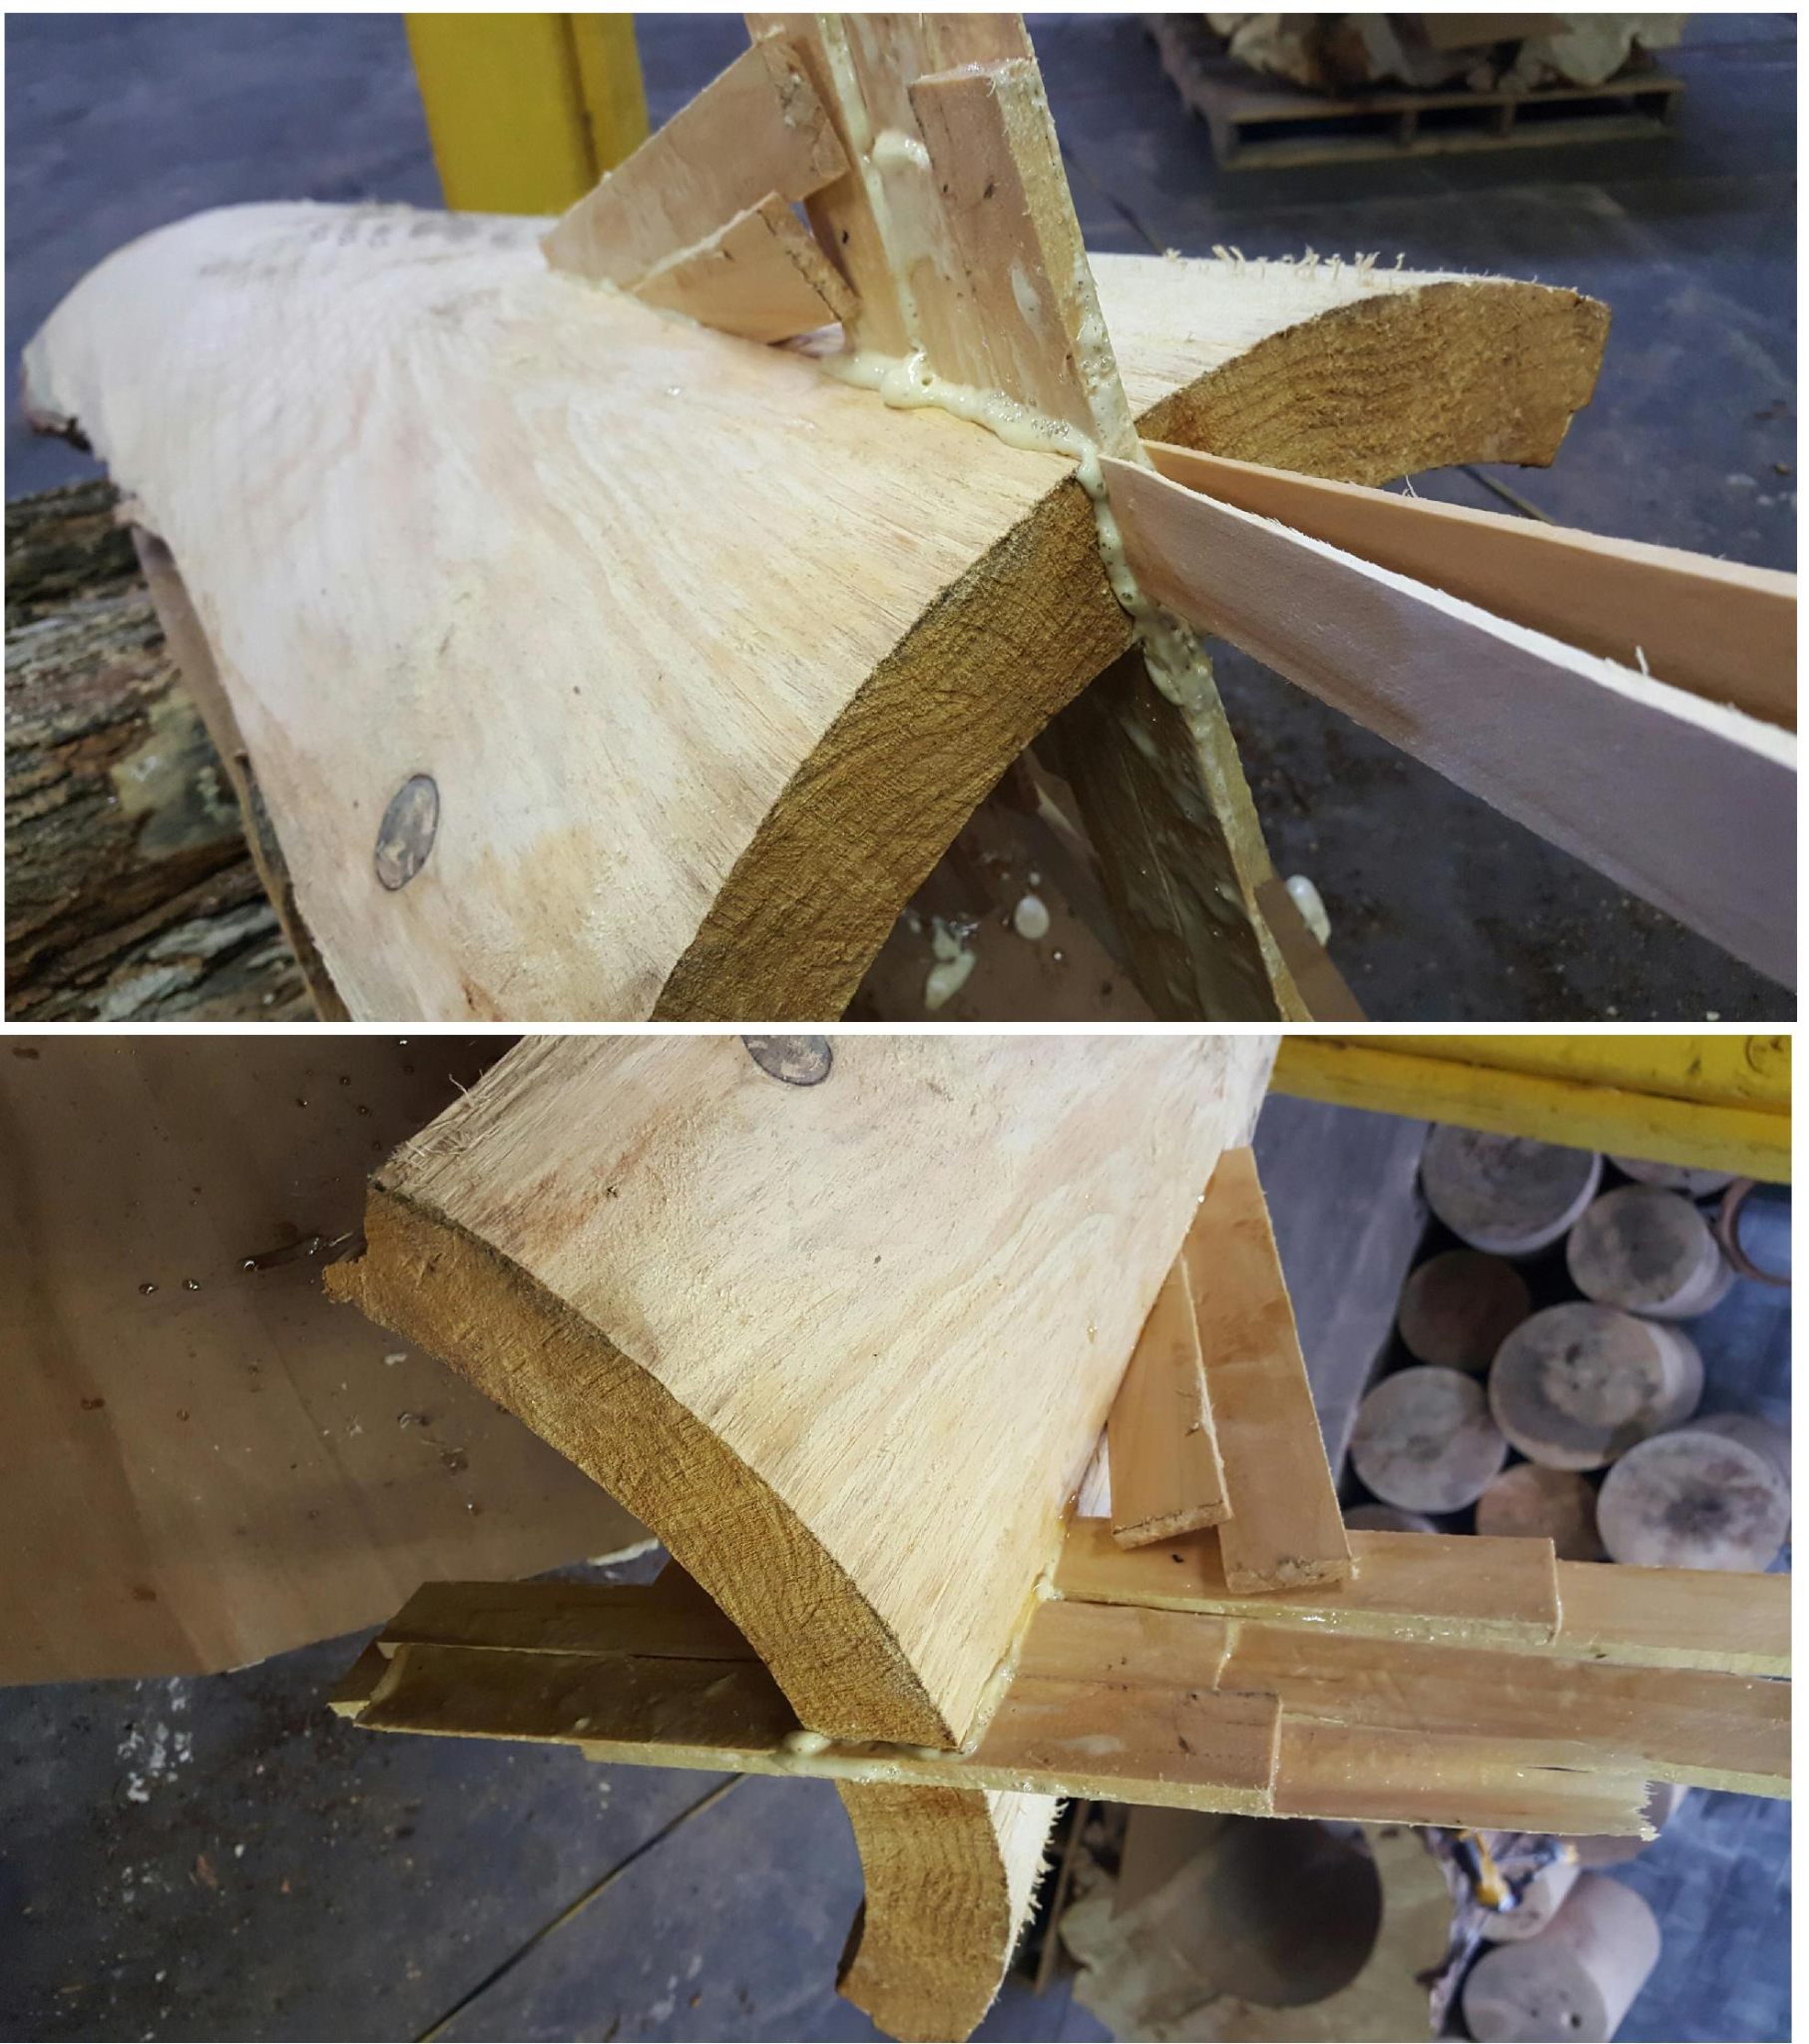
Using the hammer drill with a long auger bit sized to match your dowel rod diameter, drill a channel perpendicular to the crack — straight through the wood from the outside, crossing the crack line. Space your channels every 6–8 inches along the length of the crack.
Drill slowly and keep the bit perpendicular to the crack face. The channel needs to cross the crack cleanly so the spline bridges both sides. If the crack opens into the hollow, the bit will break through into the cavity — that is expected.
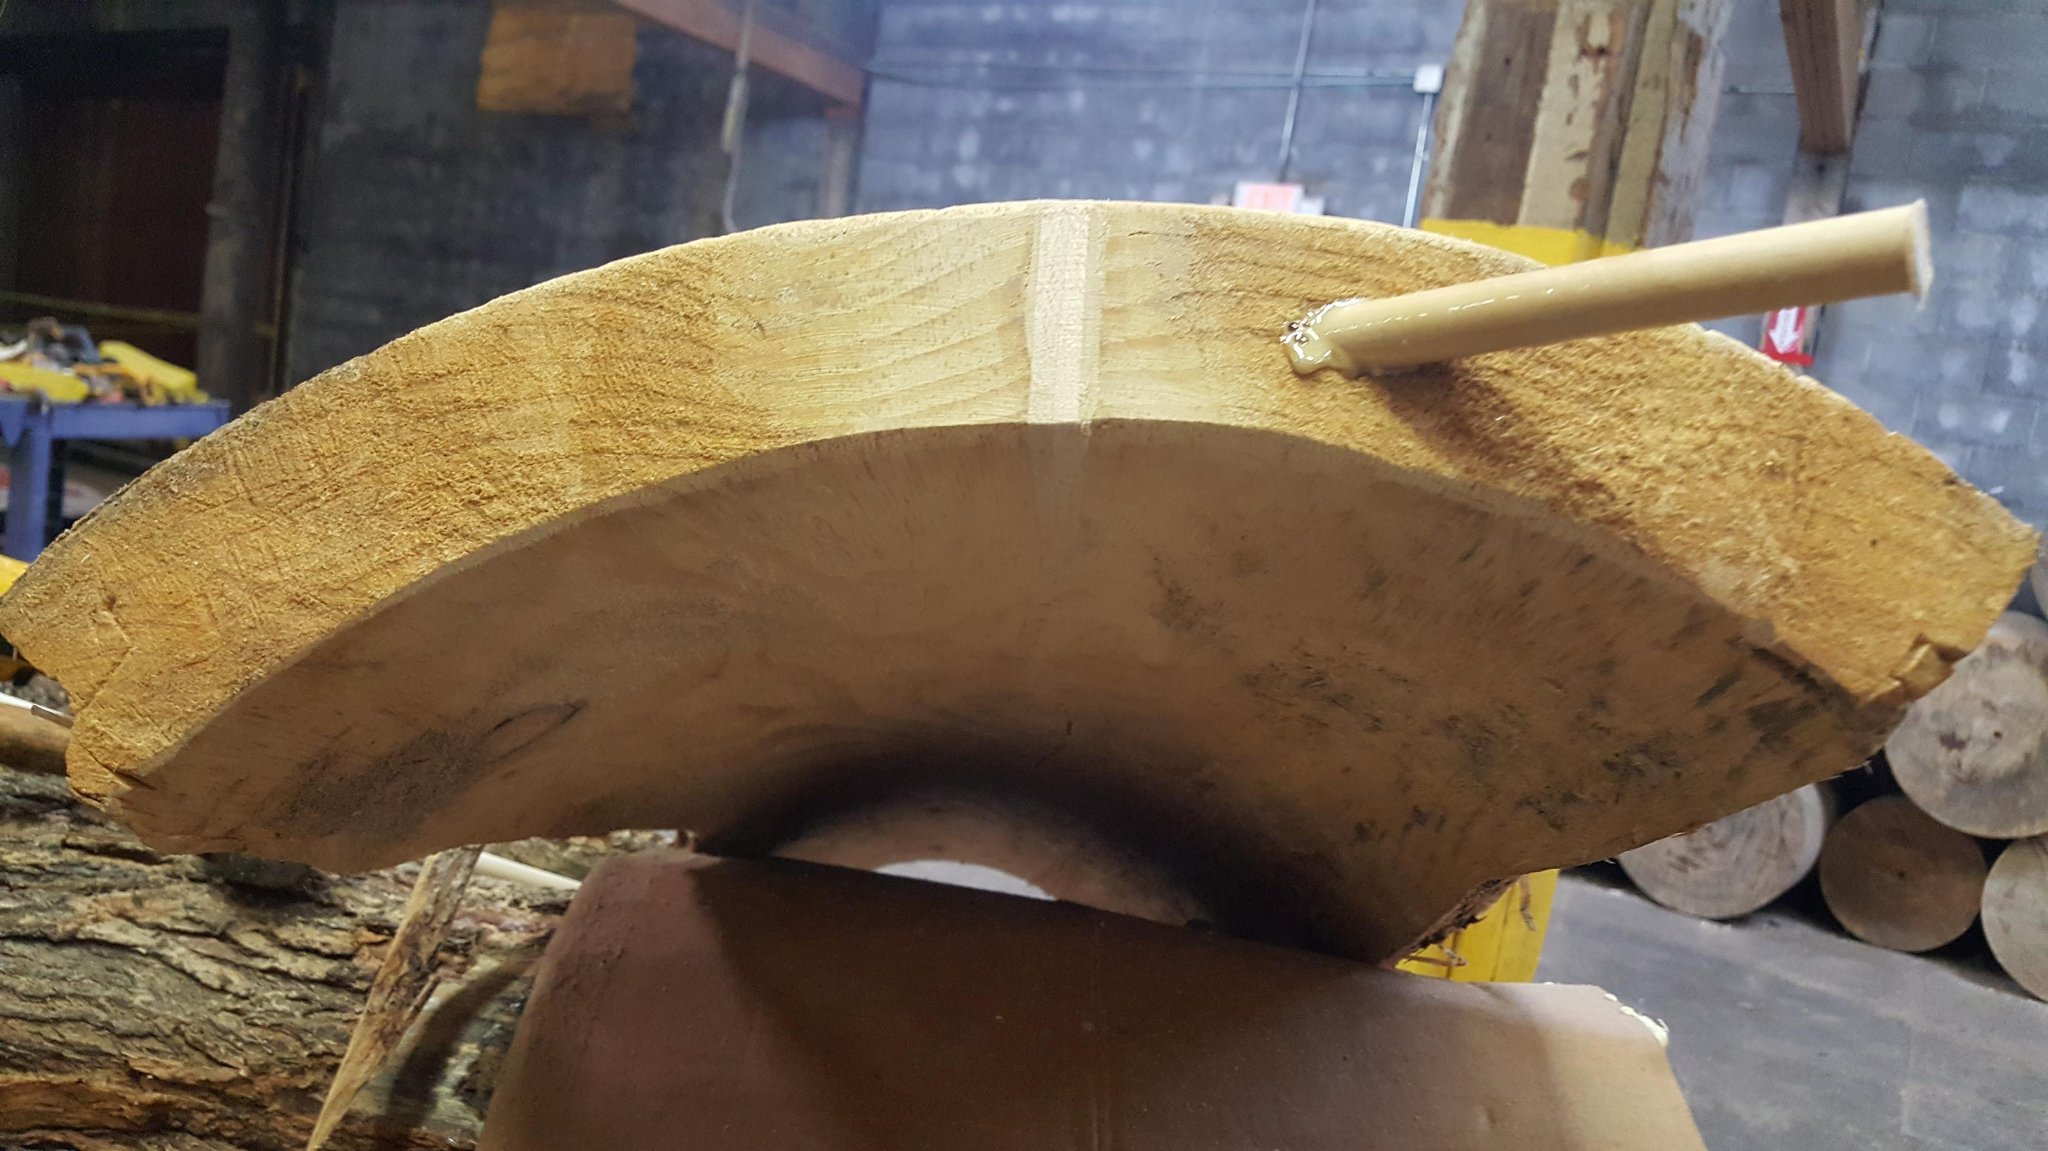
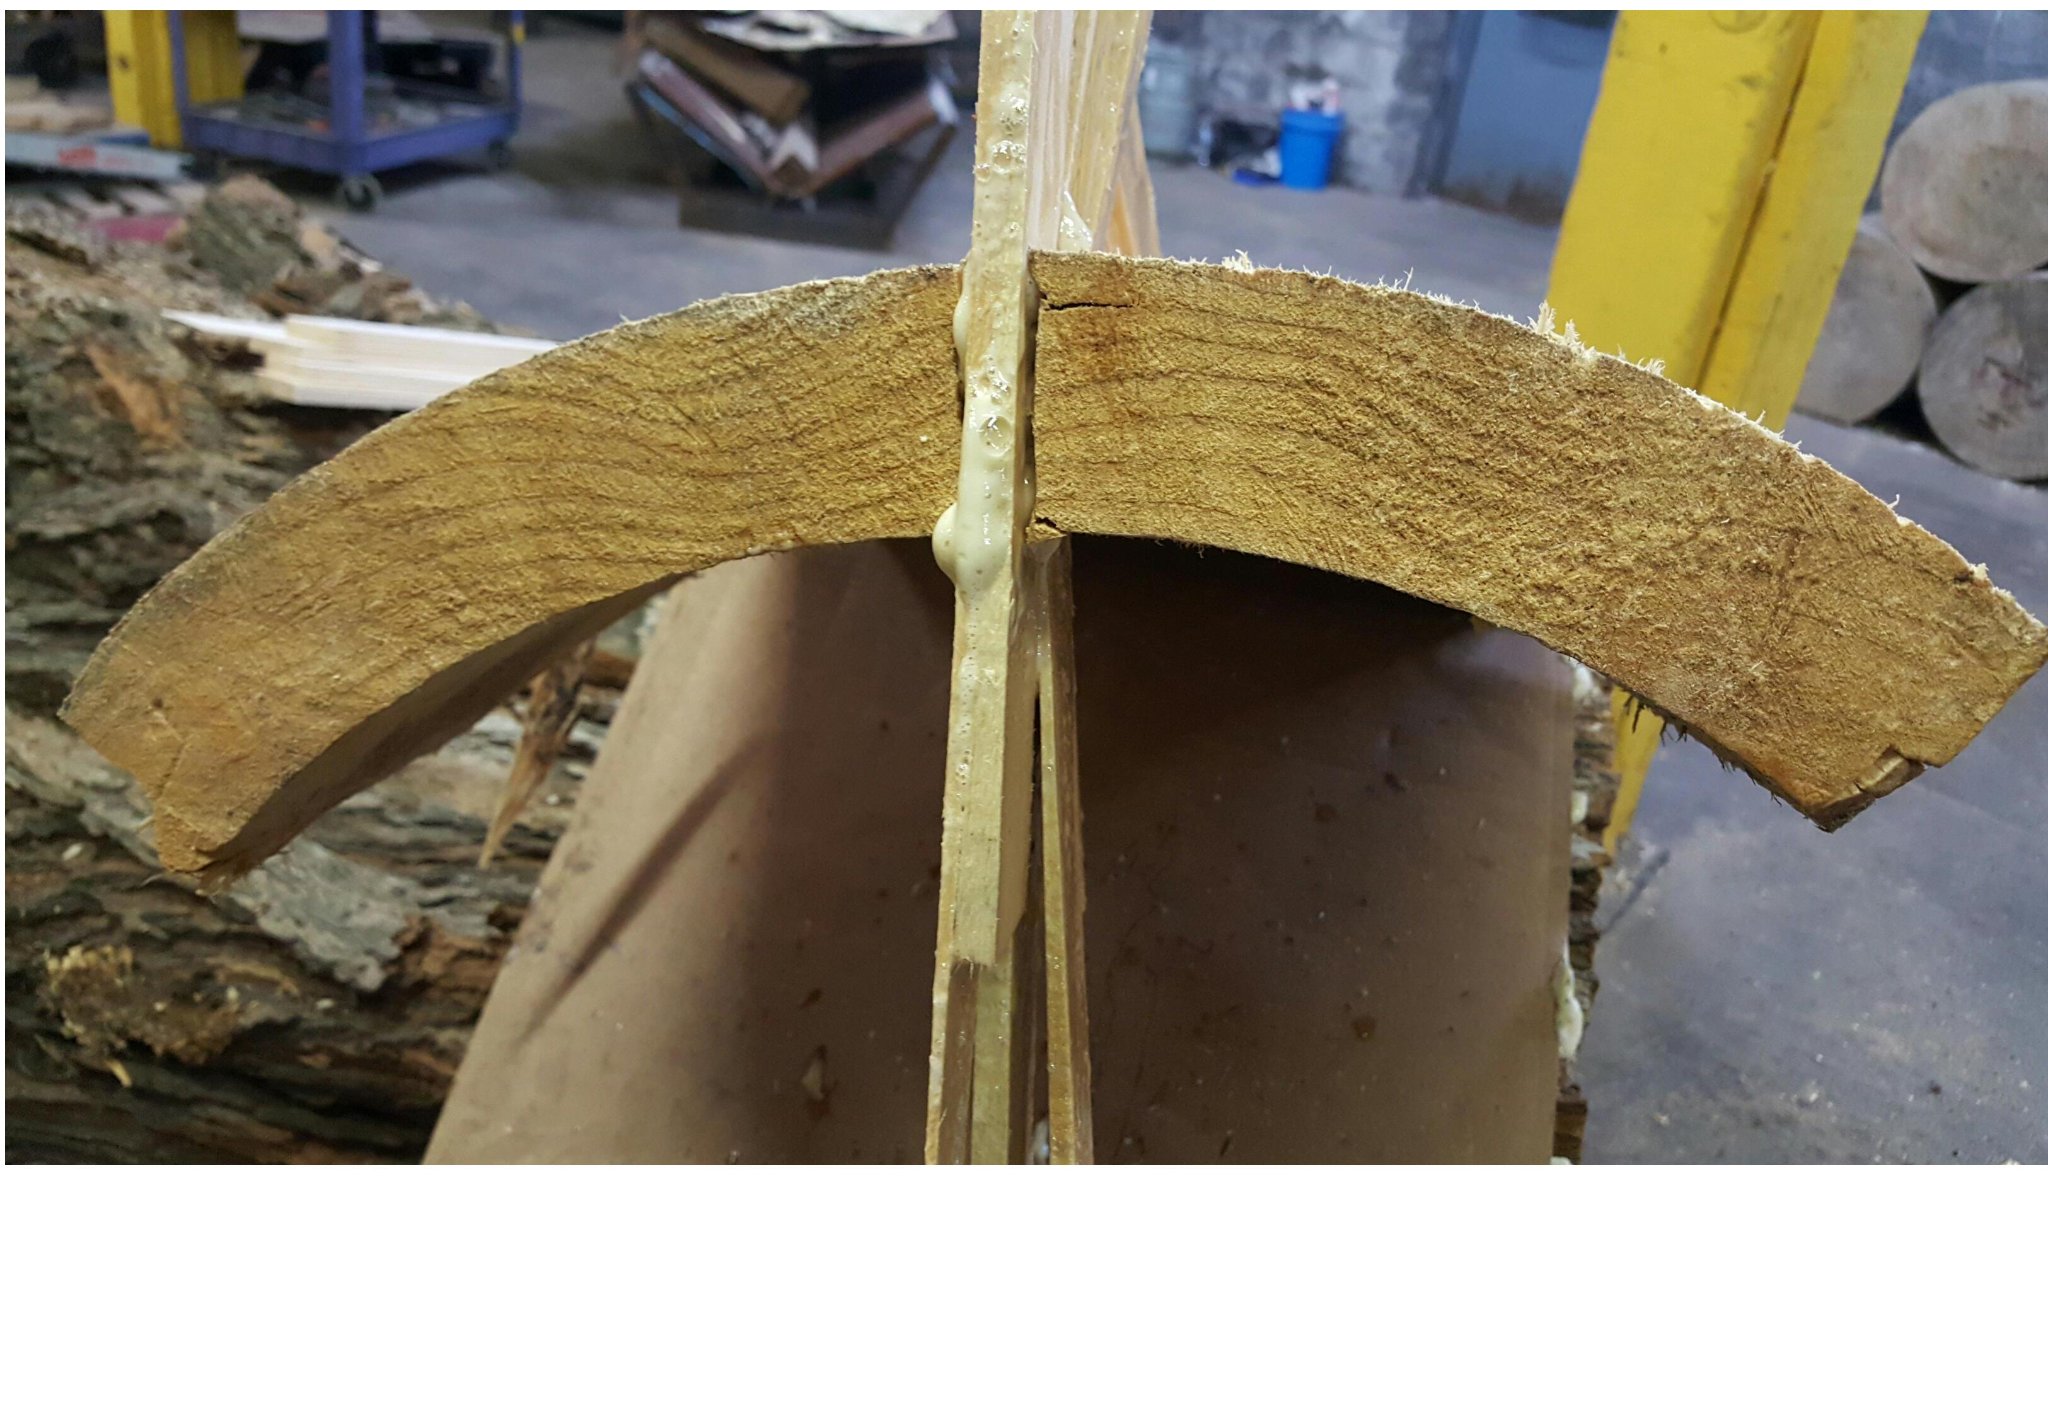
Step A3 — Apply Gorilla Glue and Drive the Spline
Apply a bead of Gorilla Glue Original into the drilled channel. Work it into the channel with the tip of the bottle — you want glue on both sides of the crack line. Gorilla Glue is moisture-activated and will expand as it cures, filling any gaps between the dowel and the channel walls.
Drive the dowel rod into the channel with the rubber mallet. Seat it firmly so it is flush with or slightly proud of the surface. Wipe away any glue squeeze-out immediately with a damp rag — cured Gorilla Glue is very difficult to remove.
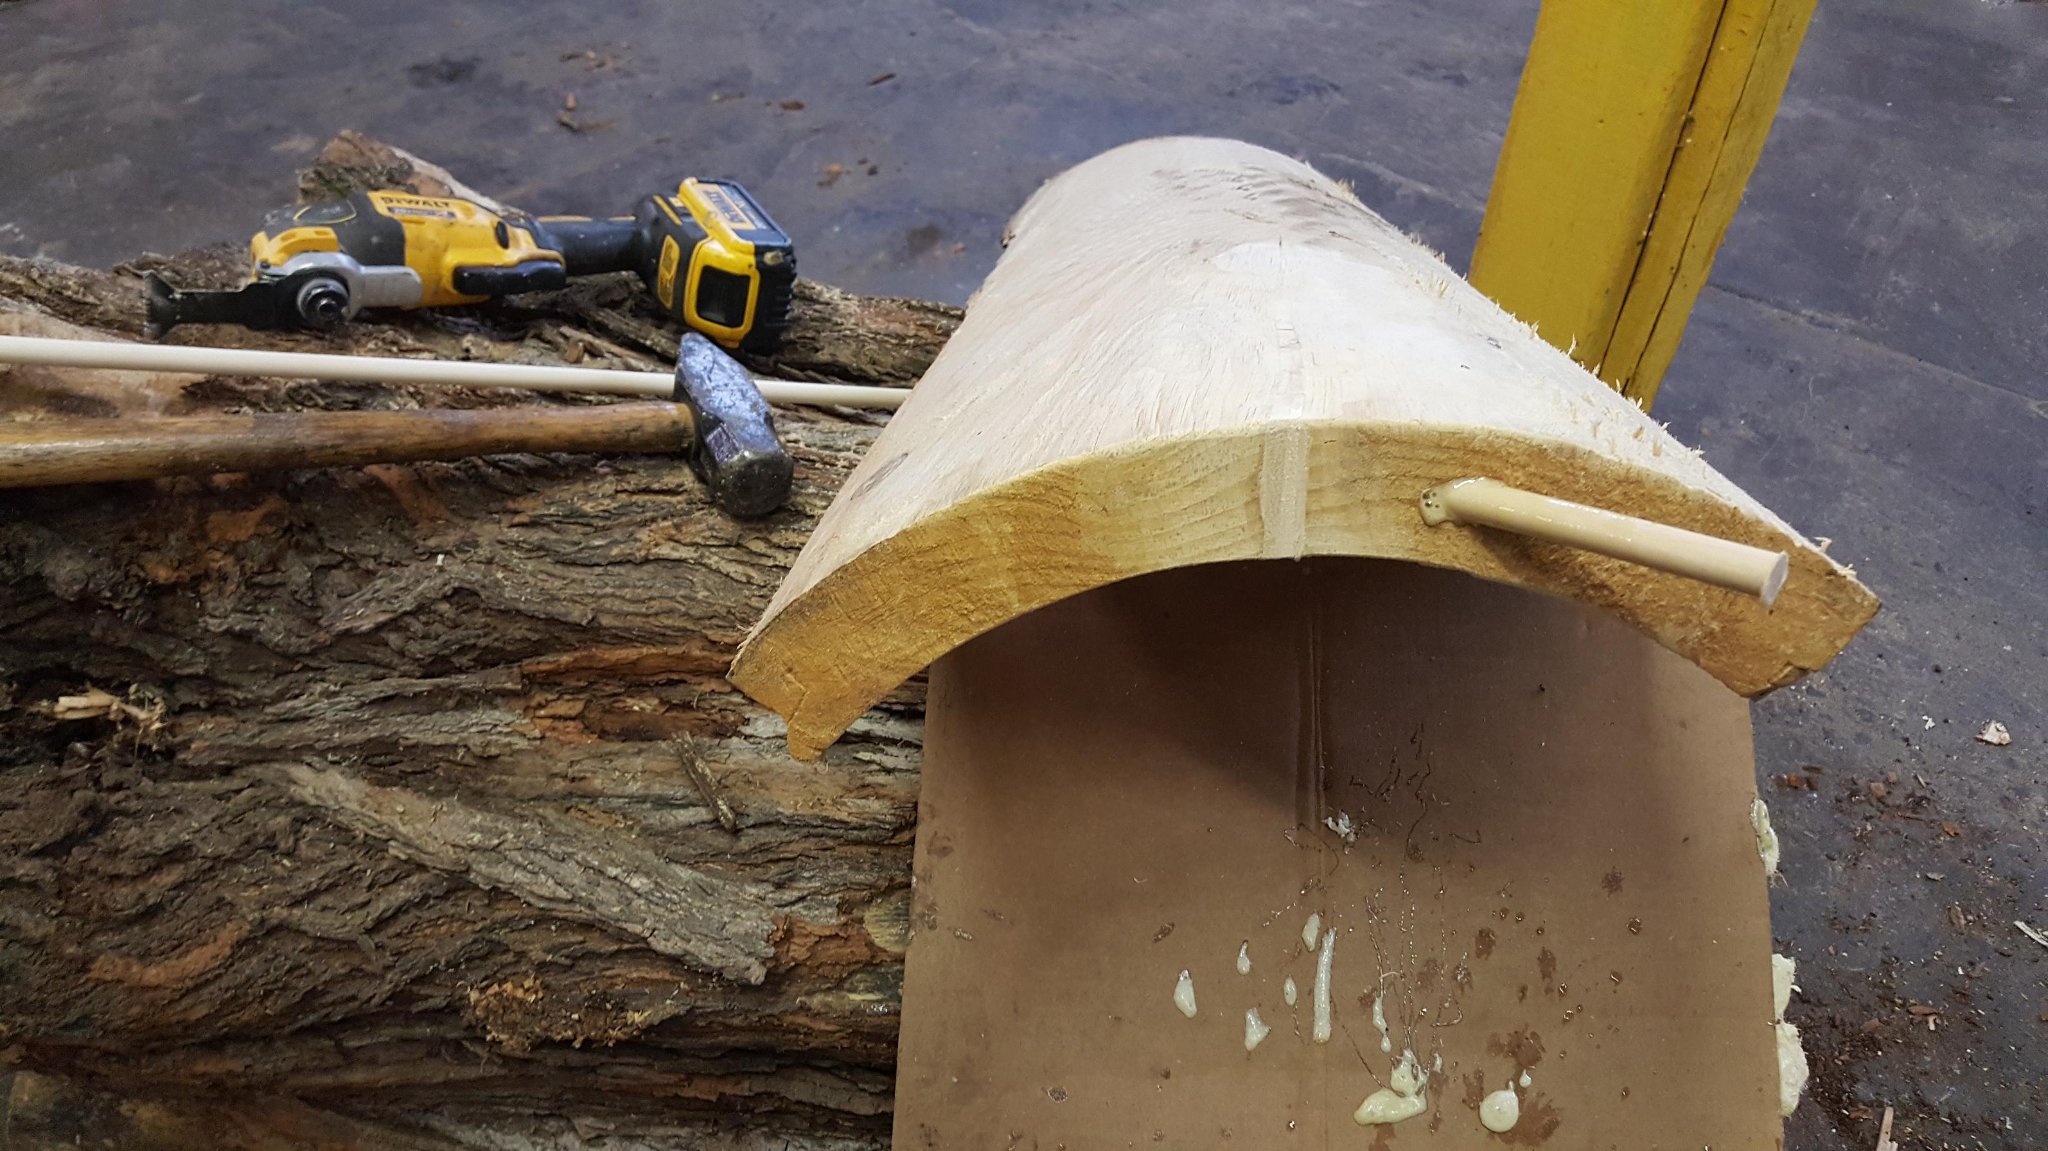
Step A4 — Check the Full Span
Step back and look at the repair from the end of the log. The dowel should span the full width of the crack, with both ends visible. If the crack is wide enough that the dowel does not fully bridge it, add a second spline parallel to the first.
Allow the Gorilla Glue to cure for a minimum of 2 hours. Overnight is better. The glue will foam slightly as it expands — that is normal and expected.
Step A5 — Trim the Spline Flush from Inside
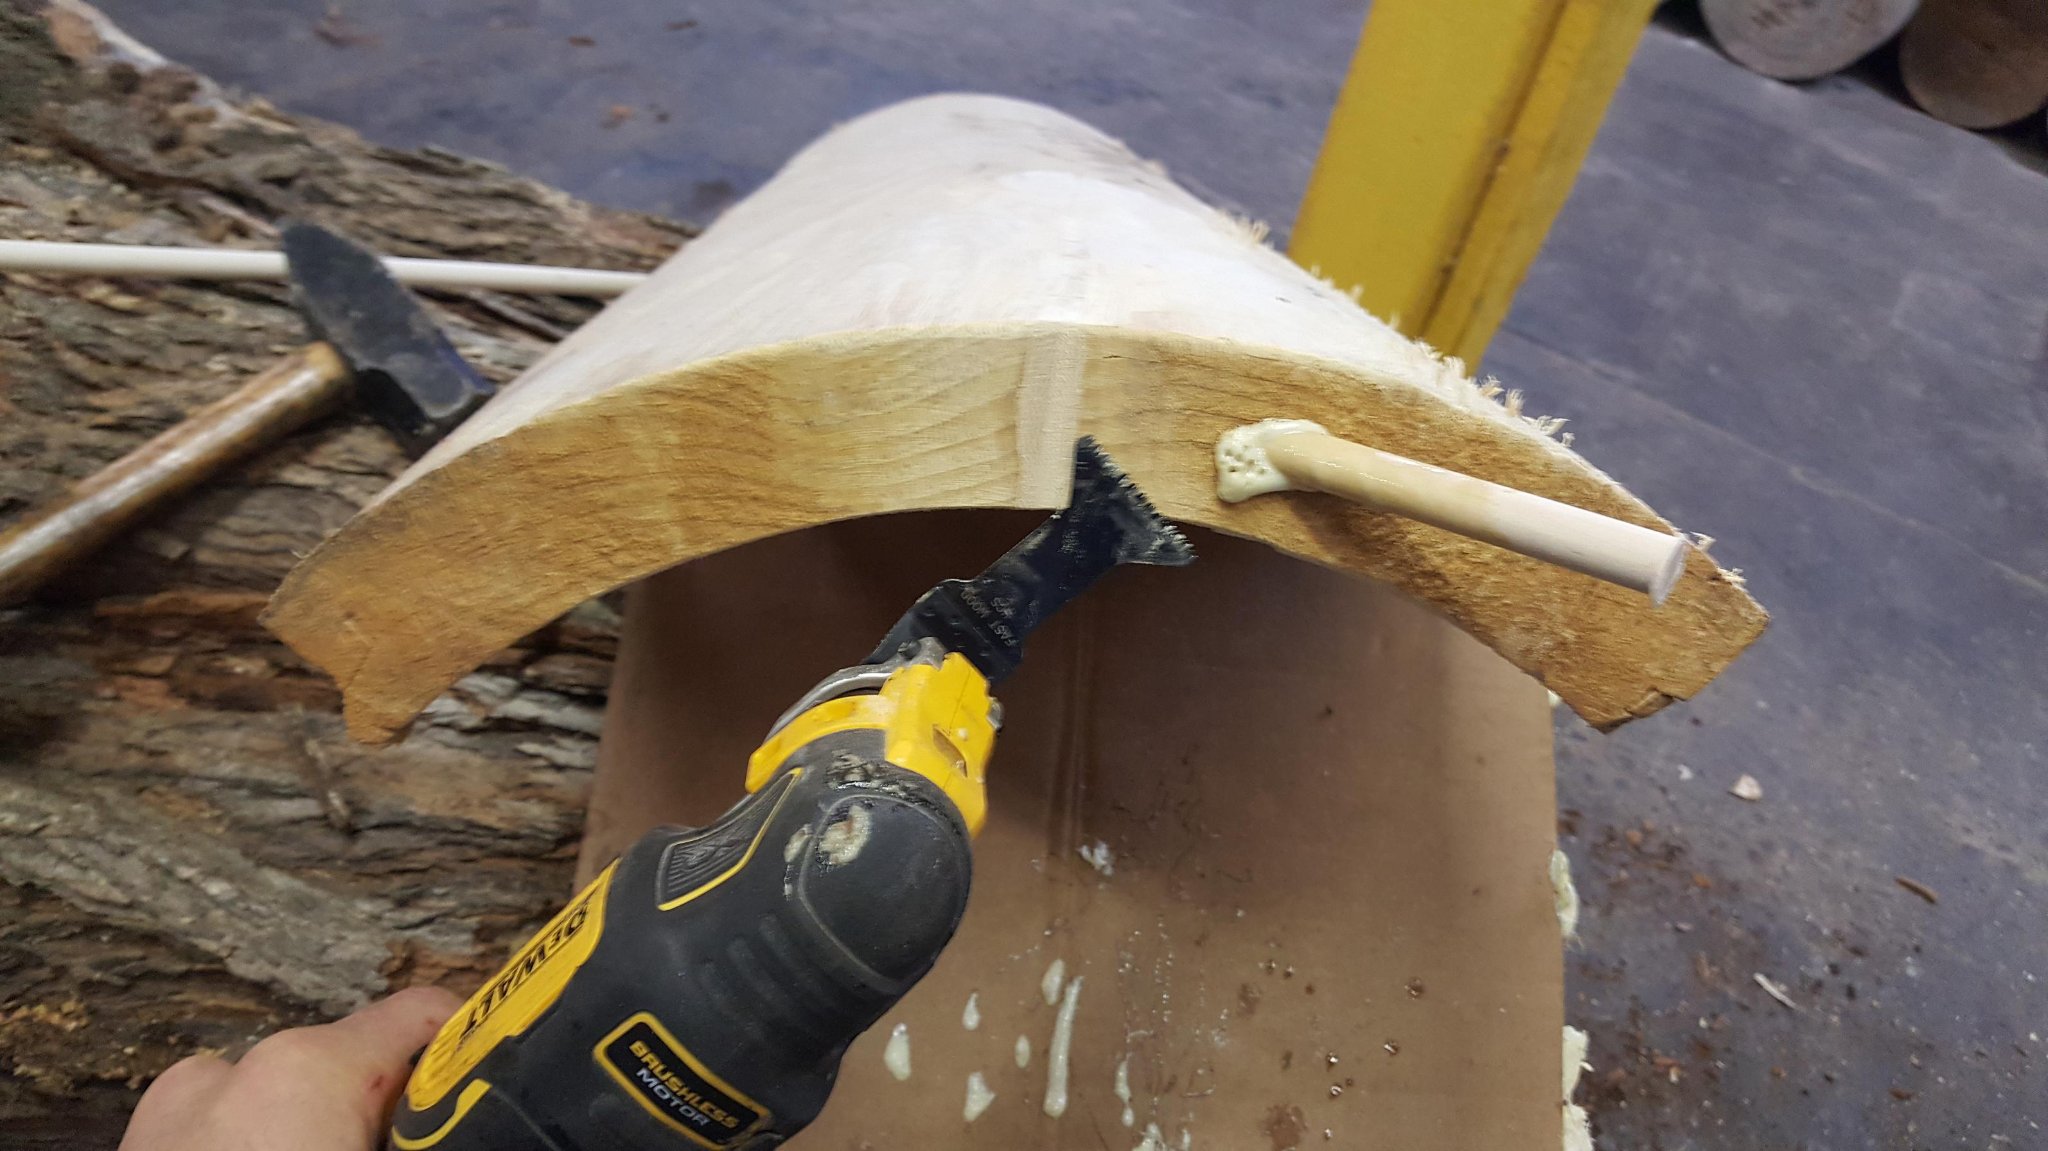
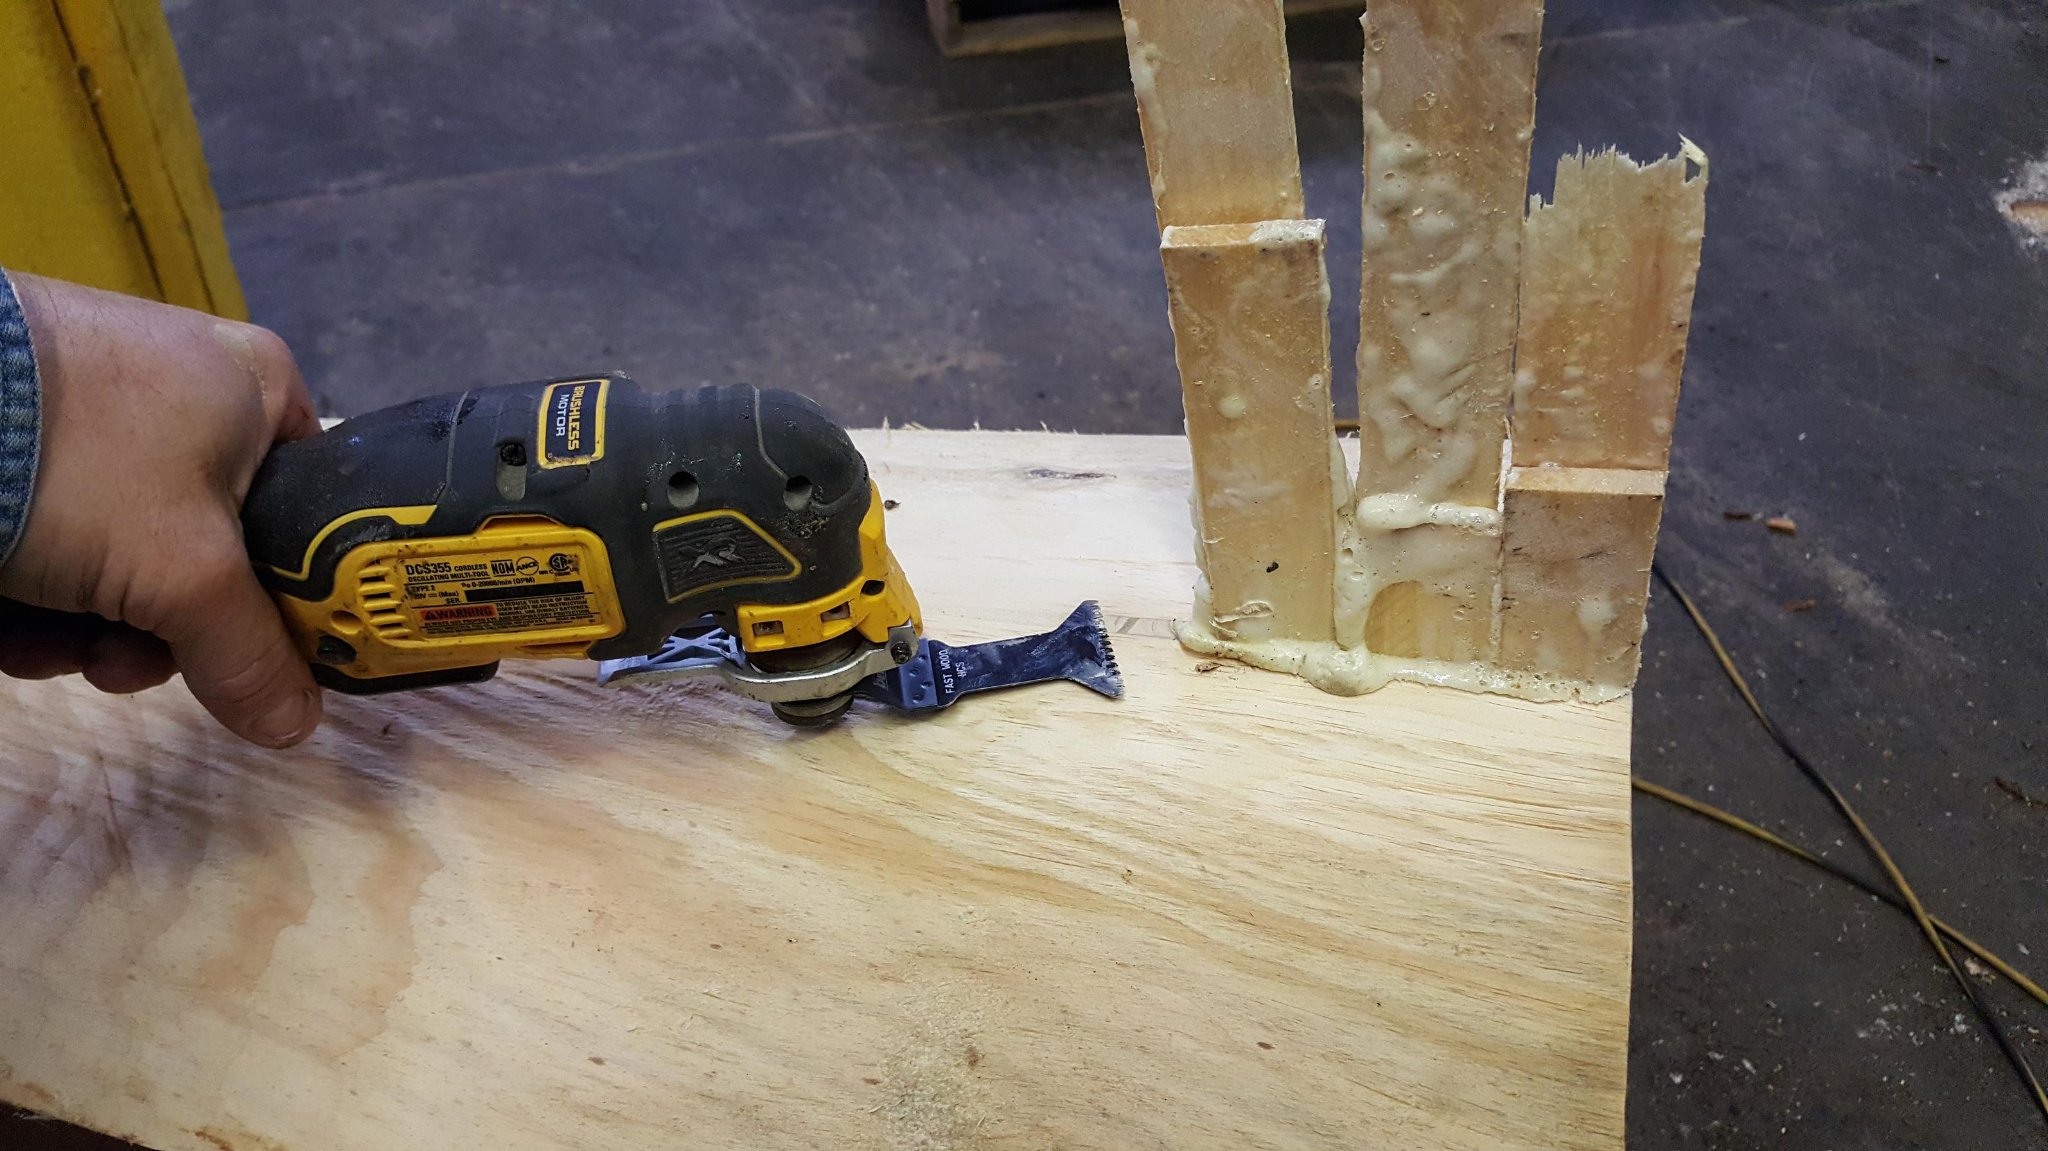
Once the glue has cured, use the oscillating multi-tool to trim the dowel flush from inside the hollow cavity. Work carefully — you want the interior surface smooth so nothing catches on it.
The oscillating blade cuts dowel rod cleanly without splintering. One or two passes is all it takes.
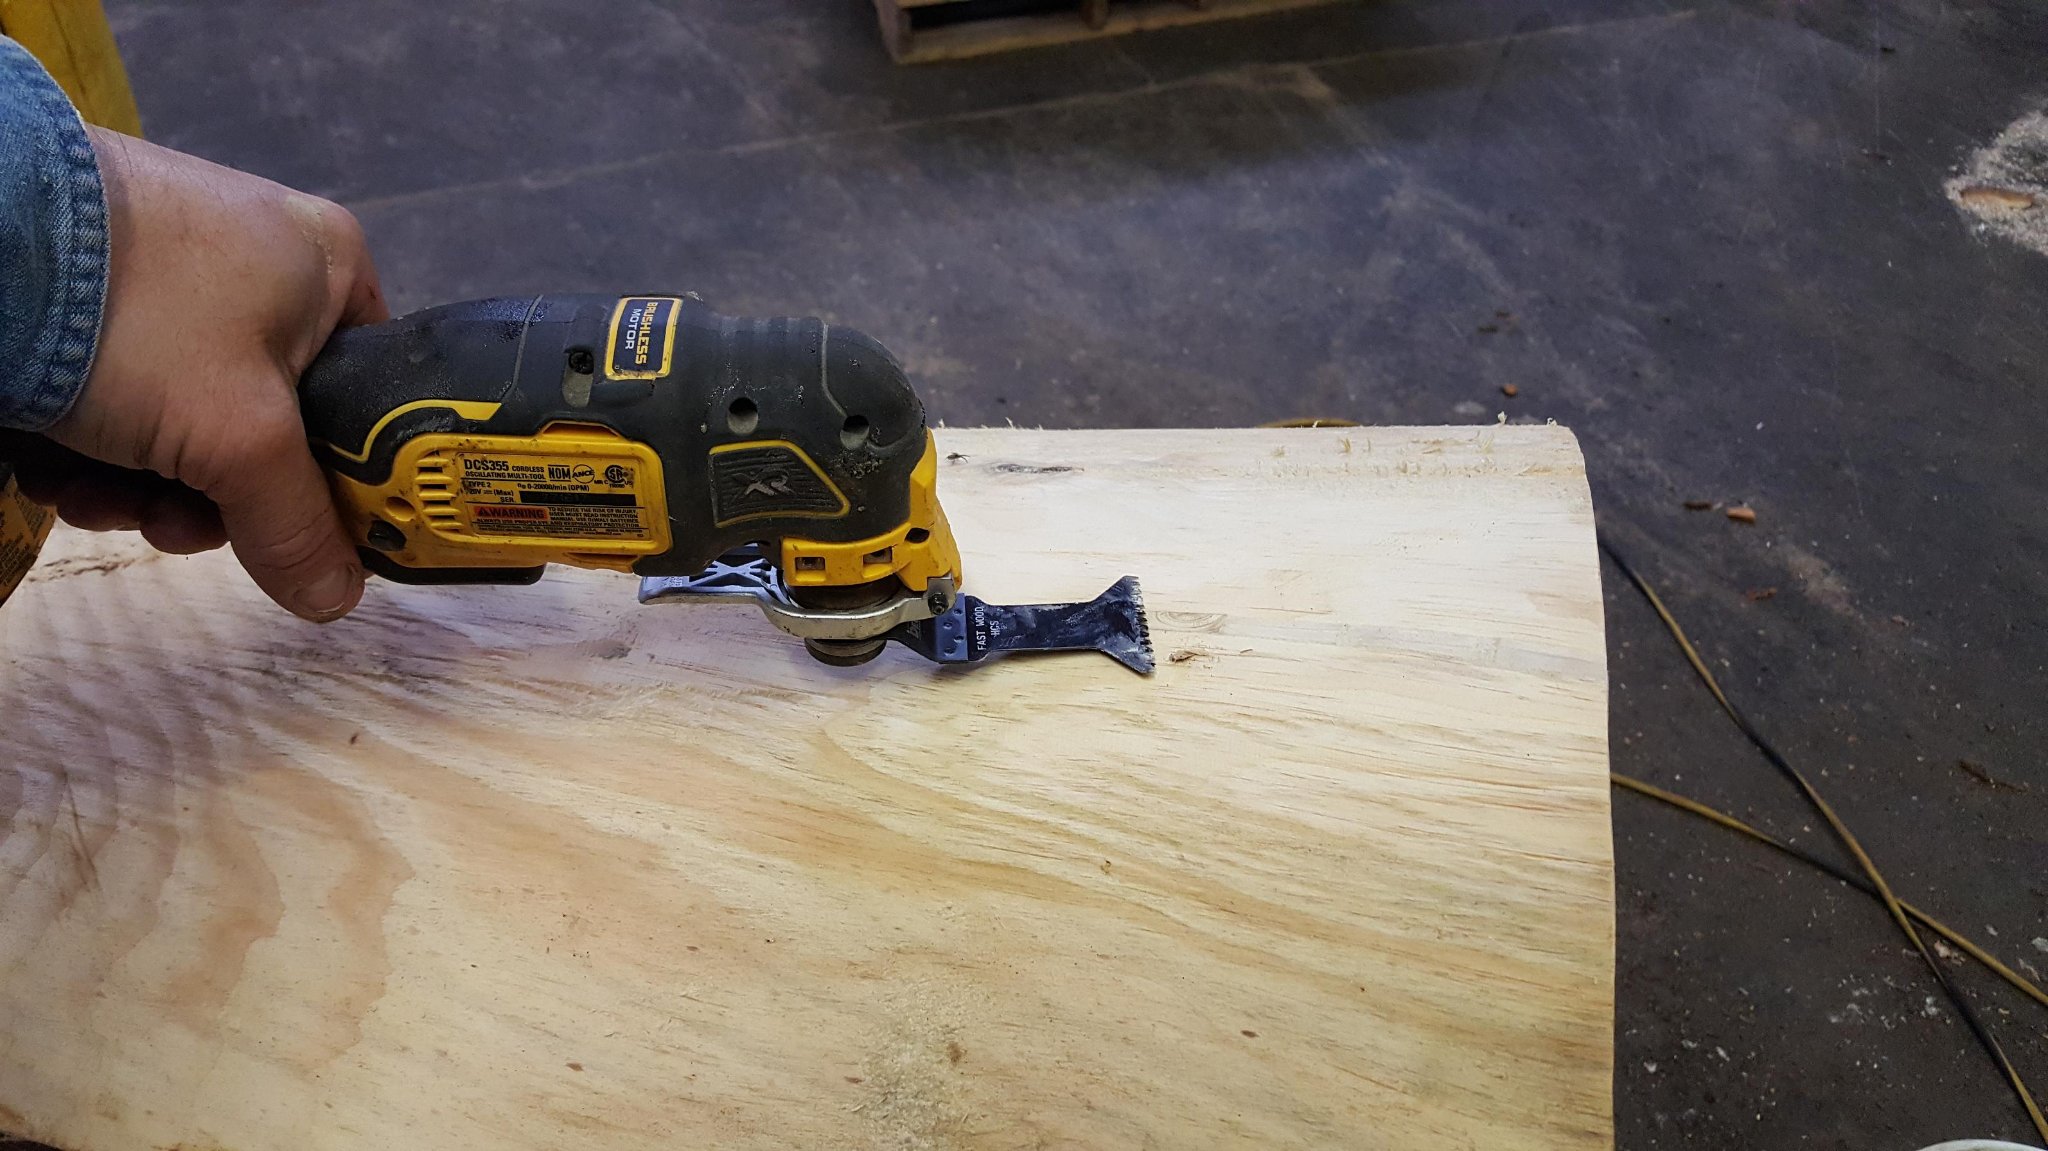
Step A6 — Trim the Exterior End Flush

Trim the exterior end of the dowel flush with the surface using the oscillating tool or a hand saw. At this point the crack should be mechanically locked — you can feel the rigidity when you try to flex the wood across the crack line.
The repair is structurally complete. The remaining steps are cosmetic.
Step A7 — Apply Wood Filler
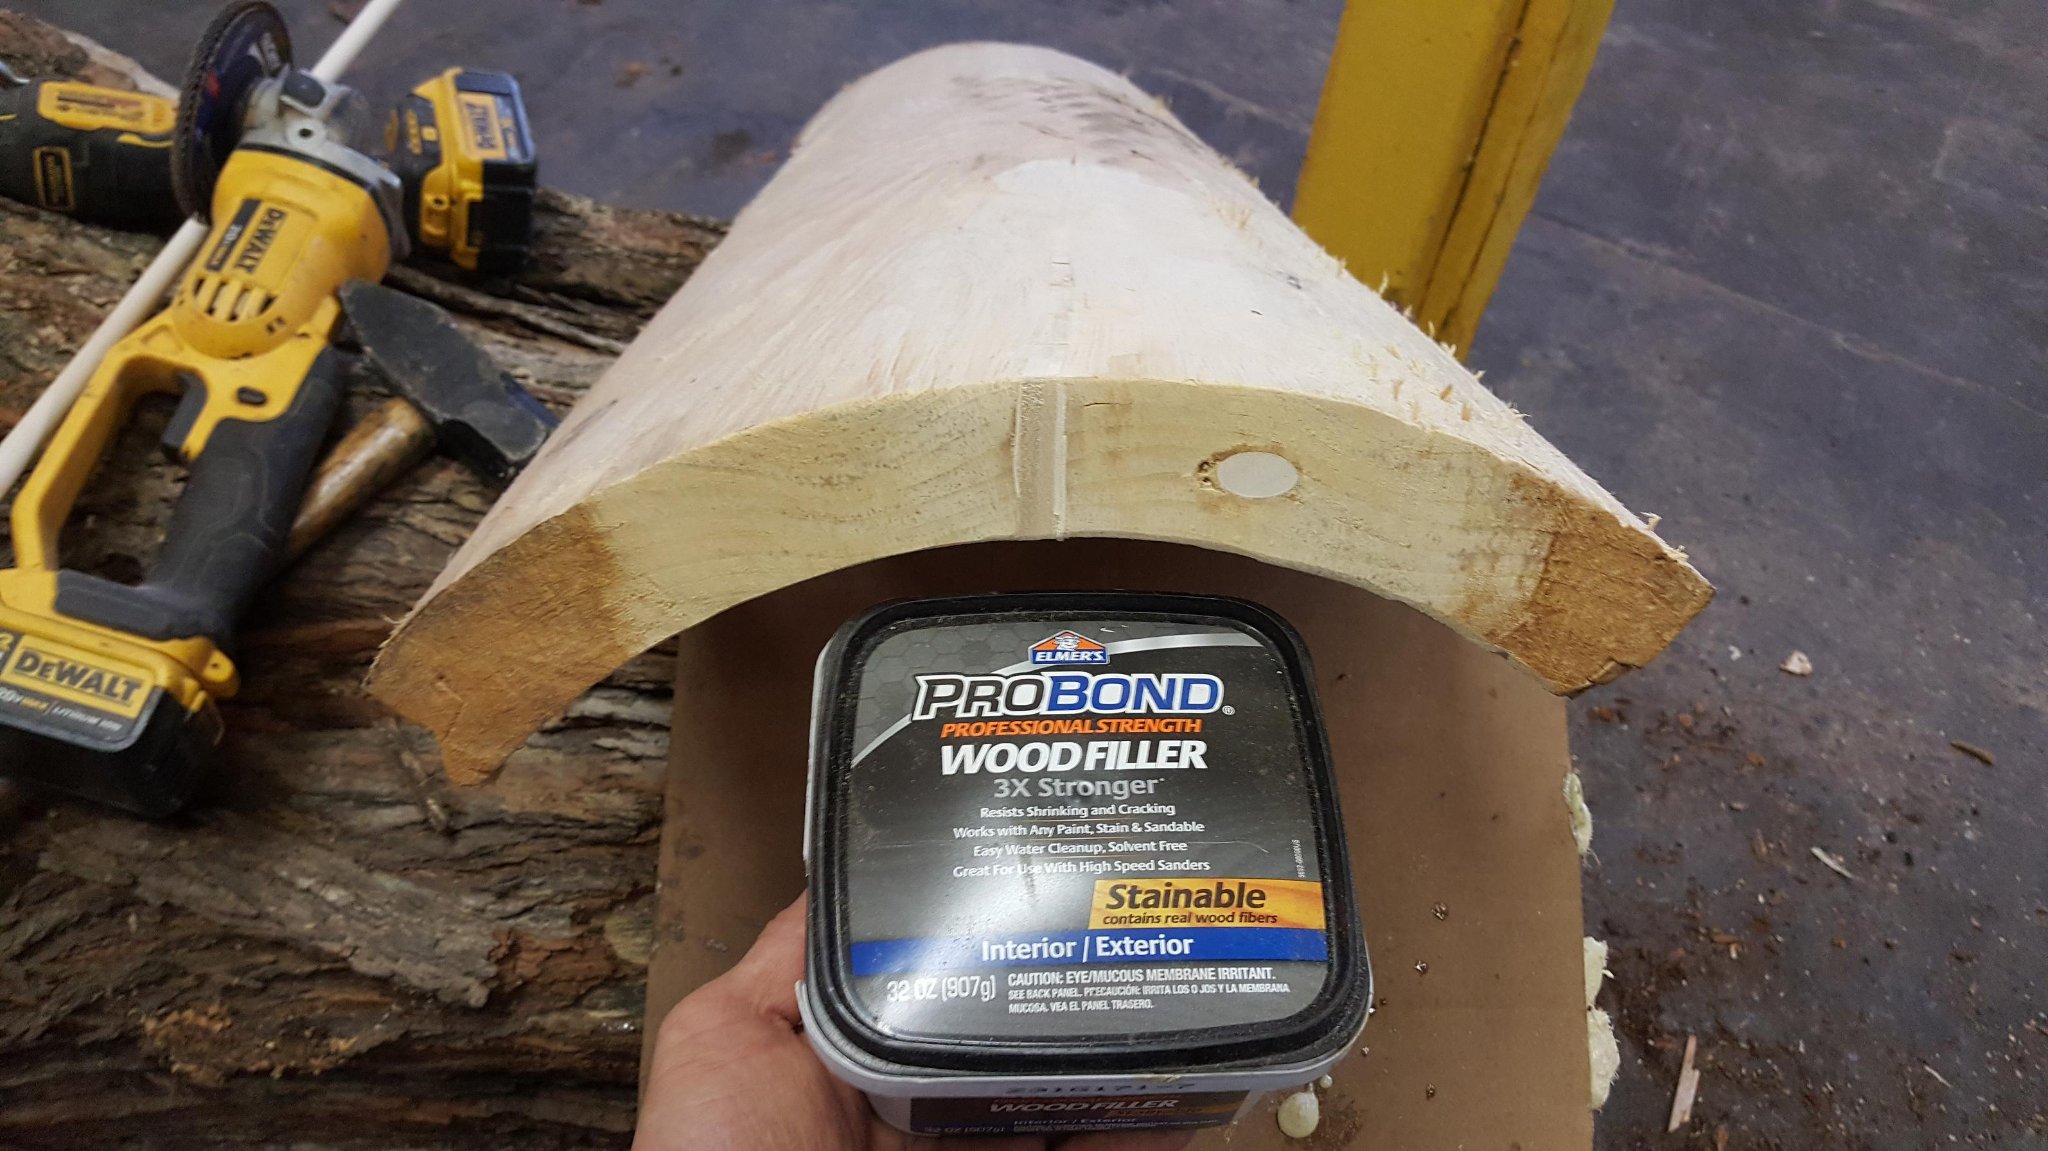
Apply Elmer's ProBond Wood Filler over the crack line and the trimmed dowel ends using a putty knife or your finger. Work it into any remaining gaps and feather the edges out onto the surrounding wood surface.
ProBond Wood Filler is stainable and contains real wood fibers — it takes stain and paint the same way the surrounding wood does. It is also rated for interior and exterior use, so it holds up outdoors without cracking or shrinking.
Allow to dry per the manufacturer's instructions (typically 15–30 minutes for a thin application, longer for deep fills).
Step A8 — Sand Smooth

Sand the filled area smooth with 80-grit sandpaper, then finish with 120-grit. The wood filler will blend into the surrounding grain. From a few feet away the repair is essentially invisible.
If you are staining the log, apply stain now — the ProBond filler will accept it and match the surrounding wood color closely.
Method B — Expanding Foam
This method is faster and better suited to narrow cosmetic cracks, outdoor installations where maximum waterproofing is the priority, or situations where you do not need a stainable finish.
Step B1 — Assess the Crack
Examine the full length of the crack. Run your finger along it to feel the depth and width. Note whether it opens into the hollow interior — if it does, you need cardboard backing before filling.
Step B2 — Install Cardboard Backing
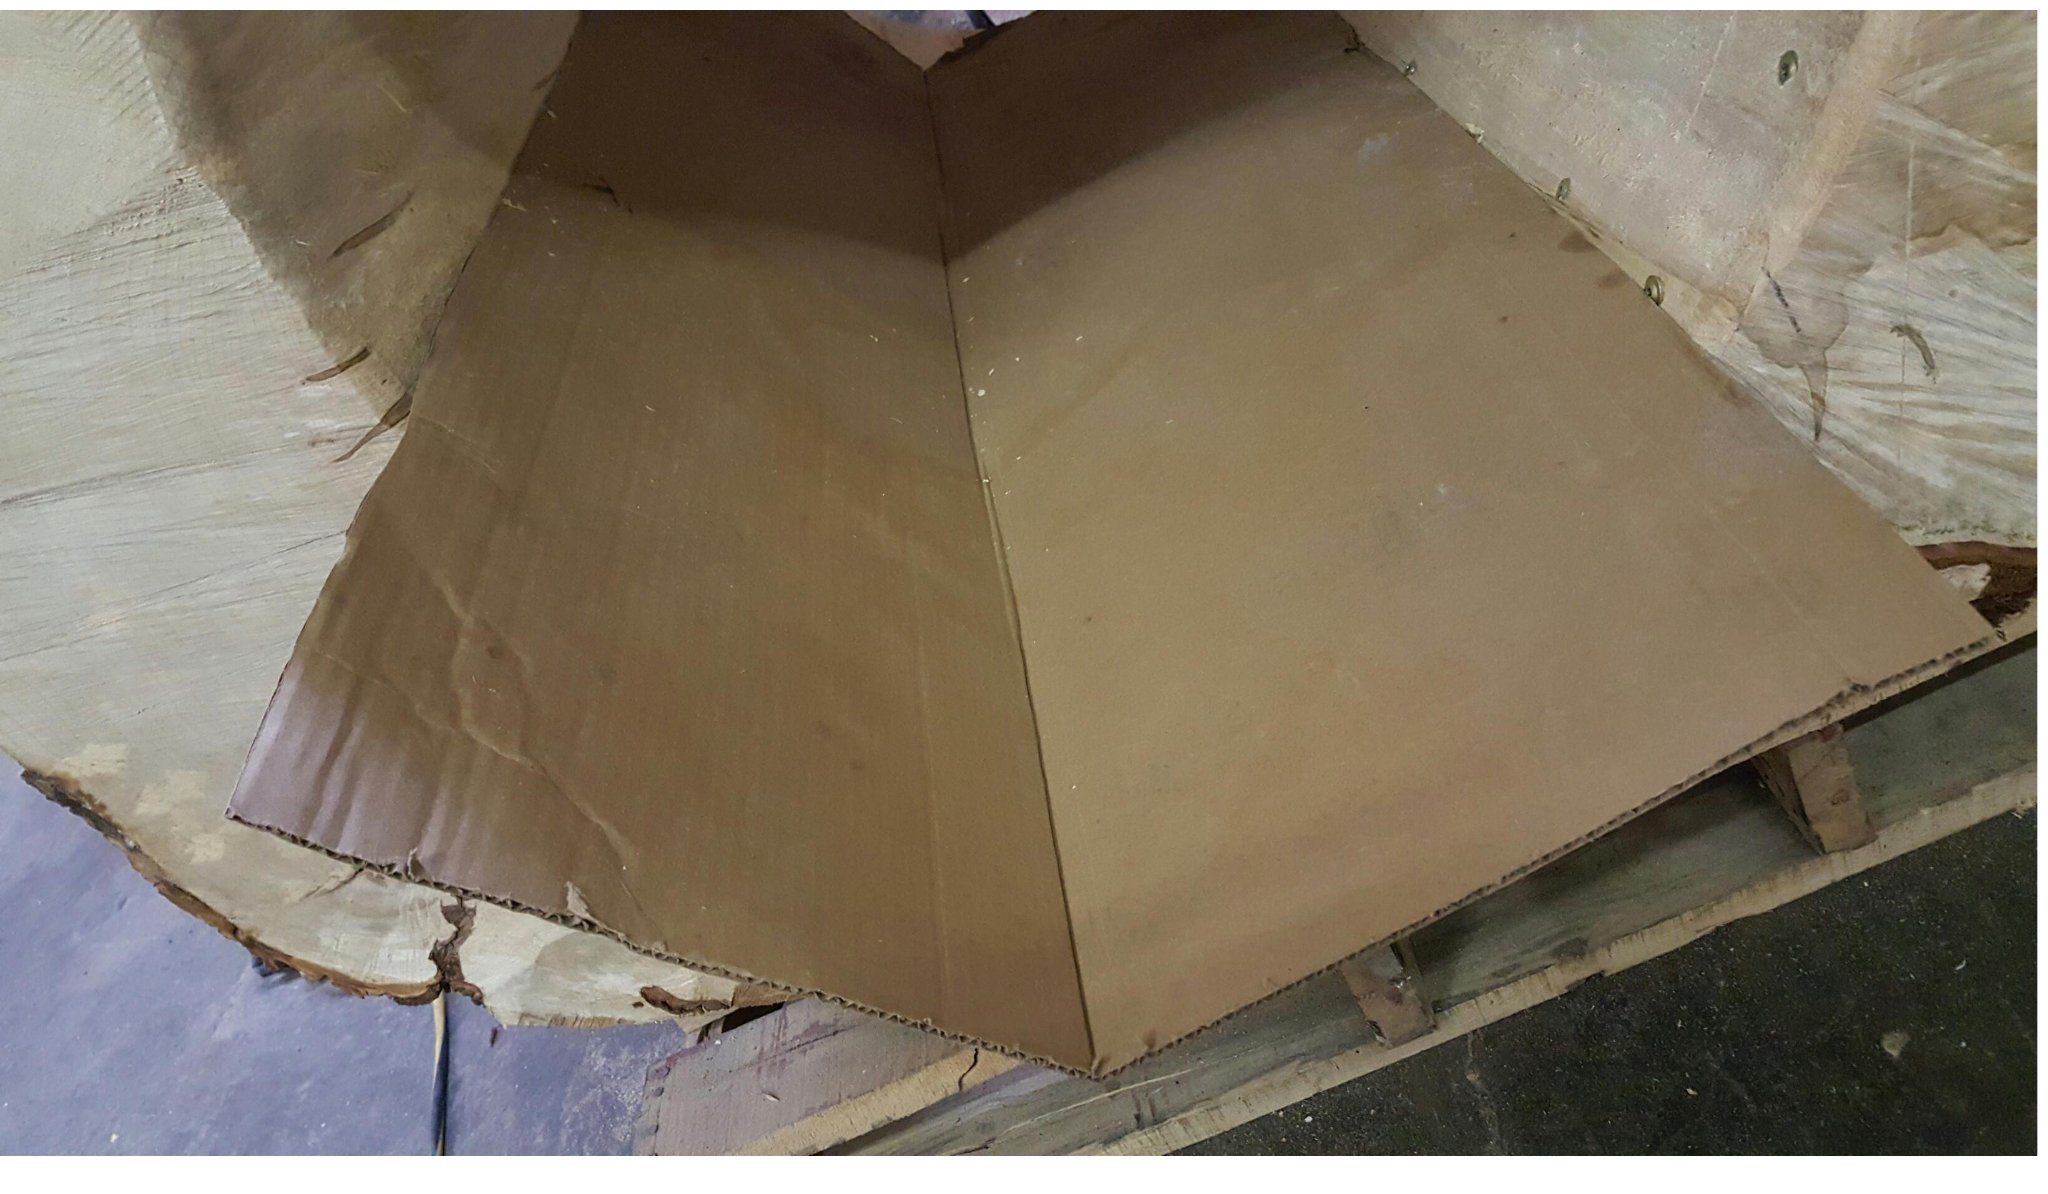
If the crack opens into the hollow cavity, cut a strip of corrugated cardboard and wedge it firmly into the crack from the inside. Fold it lengthwise into a V-shape so it wedges snugly. This gives the foam something to push against and prevents it from blowing through into the hollow.
Step B3 — Apply Expanding Foam
Apply expanding polyurethane foam into the crack from the outside. Work slowly from one end to the other, keeping the nozzle about ½" inside the crack so the foam fills from the bottom up. Apply a moderate bead — the foam will expand. Allow to cure at least 2 hours, overnight is better.
Step B4 — Foam Cured, Ready to Trim
Once fully cured the foam will be firm and slightly proud of the wood surface. The repair is structurally complete at this point — the remaining steps are cosmetic.
Step B5 — Trim with Oscillating Tool
Use the oscillating multi-tool with a wood/bi-metal blade to trim the cured foam flush with the log surface. Work in long smooth passes. Keep the blade flat against the wood and let the tool do the work.
Step B6 — Second Pass
Make a second cleanup pass to catch any high spots or ragged edges. Use a utility knife for tight areas near the bark edge.
Step B7 — Smooth with Angle Grinder
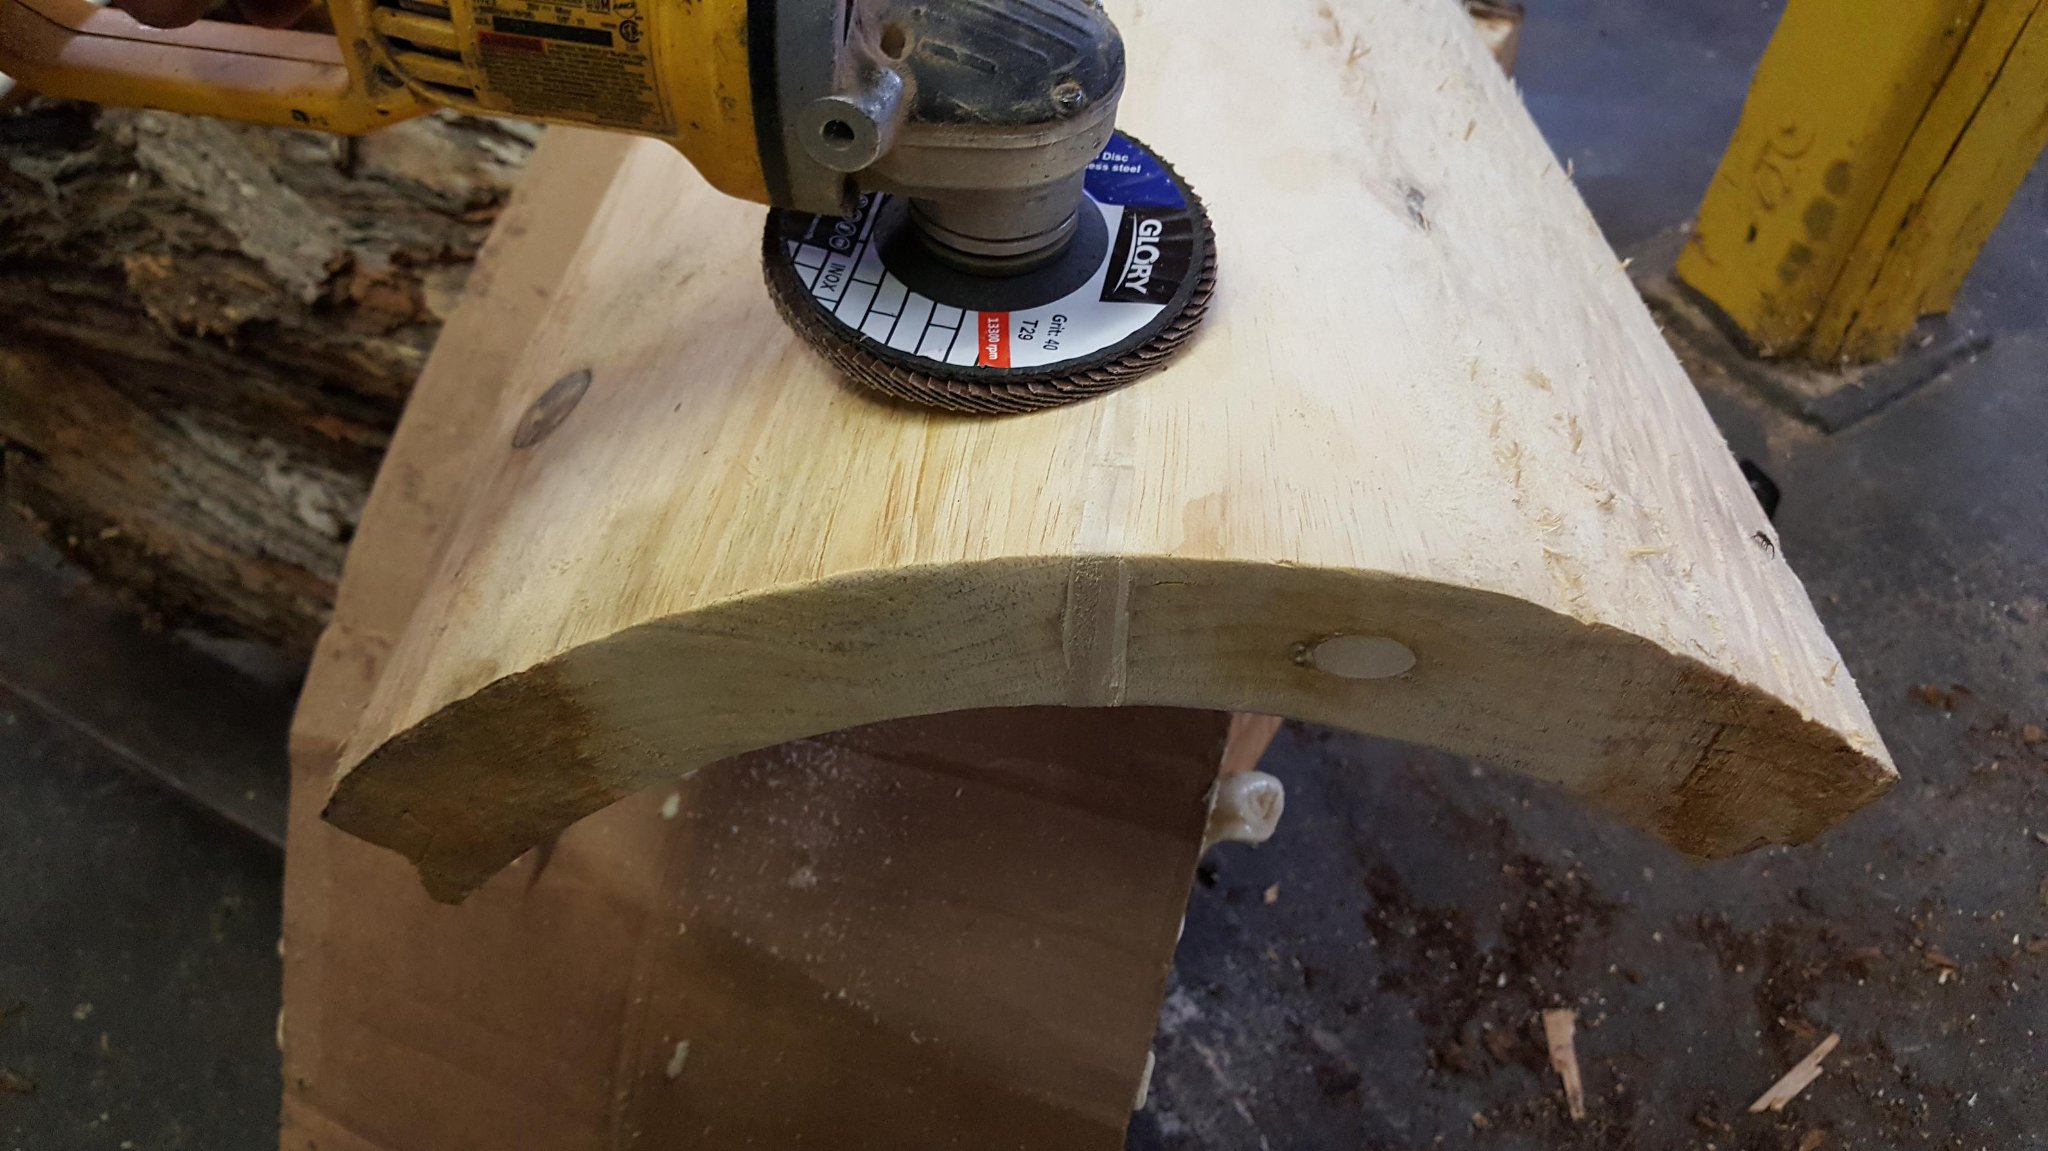
Run the angle grinder with a 40-grit flap disc over the repaired area, working in the direction of the wood grain. Two or three light passes blends the foam and wood surface together. After grinding the foam takes on a wood-like color and texture.
Step A9 — Large Cracks: Clamp to Realign First

For large cracks — especially on tunnel logs that have opened up and gone out of round — you need to squeeze the log back to shape before pinning it. Here is Bob's exact method:
Use bar clamps like these to squeeze the tunnel back to round. Once the cracks are lined up install 3/4"D x 8"L hardwood dowels through each large crack. If the crack is more than 3" tall I'd install 2 dowels. Follow the steps shown in the previous email on how to fill the cracks, for thicker cracks you may stack the shims, apply glue to both sides of each shim. Your log is dryer than it was when first installed, cracking should slow down dramatically once the wood finds its equilibrium (EMC). Following these steps will certainly extend the life of your log!
Key points from this step:
- Bar clamps first — squeeze the tunnel back to round before drilling any spline channels. If you pin it while it is out of round, you lock the distortion in permanently.
- 3/4" diameter × 8" long hardwood dowels — this is the specific size that works for large structural cracks. Do not substitute smaller dowels on big cracks.
- Two dowels per crack if the crack is taller than 3". Space them evenly across the crack height.
- Stack shims for wide cracks — if the crack gap is too wide for a single shim to fill, stack multiple cedar shims and apply Gorilla Glue to both sides of each one before driving.
- EMC equilibrium — once your log has dried to its local equilibrium moisture content (EMC), cracking slows dramatically. The first season after installation is when most movement happens. After that, the wood stabilizes and the repairs hold for years.
Which Gorilla Glue to Use
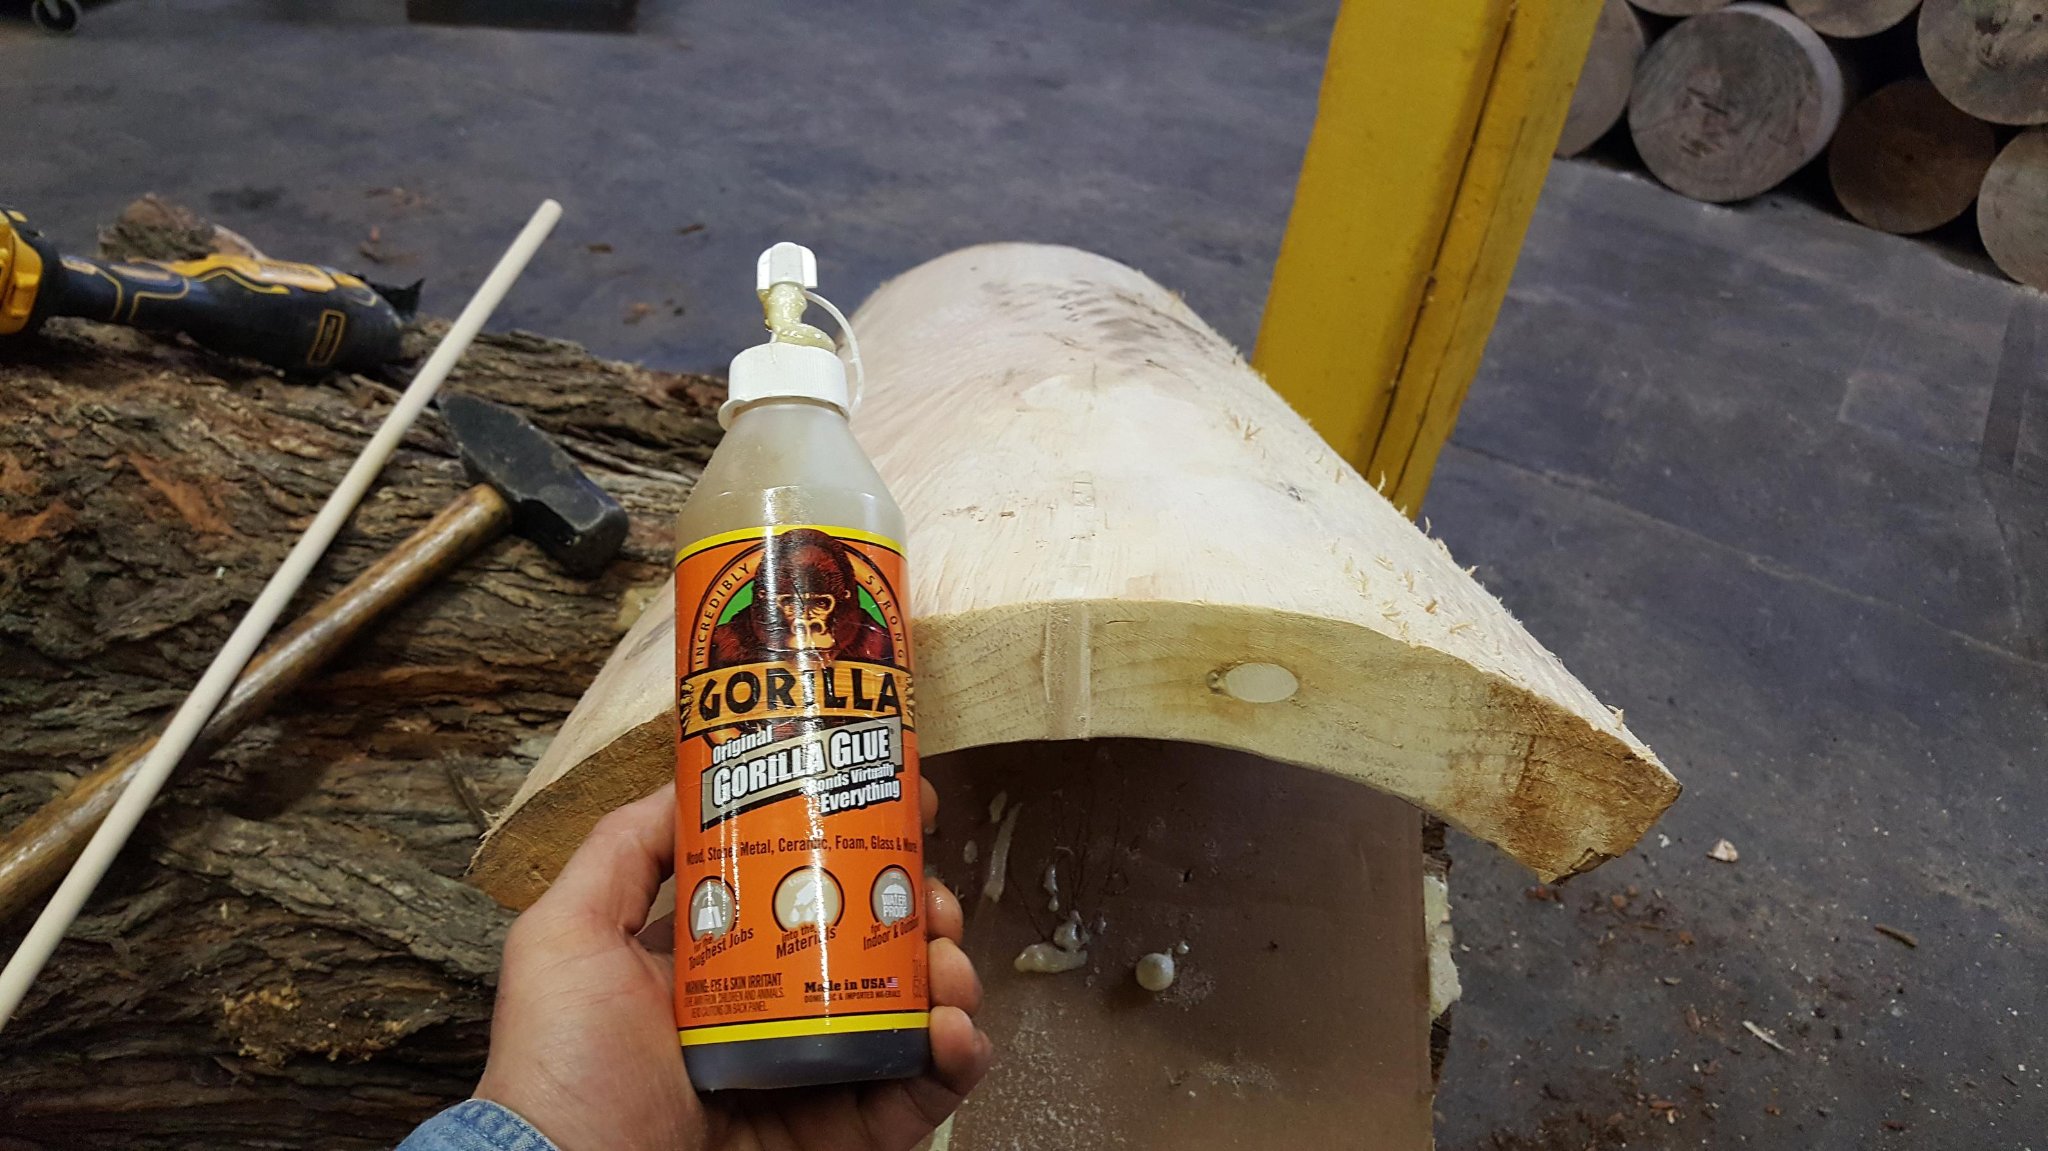
Use Gorilla Glue Original — the amber-colored expanding polyurethane formula, not the white PVA version. The original formula expands as it cures, filling micro-gaps in the wood channel and creating a mechanical lock in addition to the chemical bond. It is waterproof, rated for interior and exterior use, and bonds to wood, foam, stone, metal, and ceramic.
Dampen the channel walls lightly with water before applying — Gorilla Glue is moisture-activated and cures faster and stronger with a slightly damp surface.
How Long Do These Repairs Last?
Done correctly, both repairs are essentially permanent. The dowel spline method creates a mechanical lock that is often stronger than the surrounding wood. The foam method creates a flexible waterproof seal that moves with the wood through seasonal expansion and contraction.
We have repaired logs at IC WOOD that have been in service for over a decade. The repairs are still holding. The wood around them has continued to weather and age naturally, but the cracks have stayed sealed.
When to Call Us
If your log has developed a crack wider than ½", running the full length, or causing a wall section to separate — that is a structural issue. Contact us at hollowlog.com and we will assess whether a repair is appropriate or whether a replacement section is the better solution.
For everything else — the normal surface checks and seasonal cracks that every real wood product develops — these methods work. They are what we use. They are what we recommend.
Real wood cracks. Real wood also gets fixed. That is what makes it real.
Explore Topics
Written by
Bob Kilgore, IC WOOD LLC
Content creator and writer sharing insights and stories.